Clementi Square Piano Number 8791 (c.1812)
Collection of David Hackett, Chelveston, Northamptonshire
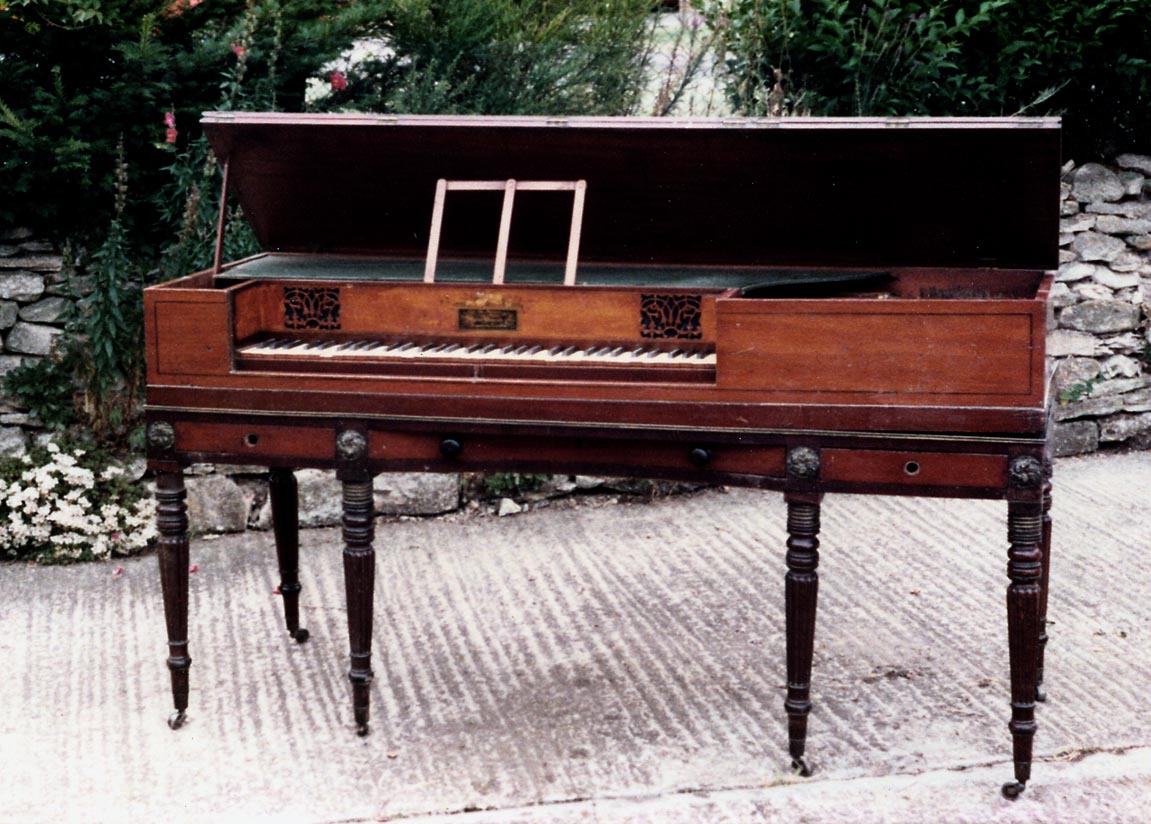
Image reproduced with the kind permission of David Hackett. Click on photo for greater detail.
LISTEN TO THE SOUND OF A CLEMENTI PIANO!
c.1810-1815 Clementi & Co. square piano sold by The Music Room Workshop
Check Lucy Coad Square Piano Conservation and Repair for Clementi piano sales
This diary is also shown on the website Friends of Square Pianos
Image reproduced with the kind permission of David Hackett. Click on photo for greater detail.
Restoration Notes – Part 1: May 2007
Restoration Notes – Part 2: July 2007
Restoration Notes – Part 3: October 2007
Restoration Notes – Part 4: February 2008
Restoration Notes – Part 1
There is a strong thread of continuity running through the pianos of Longman & Broderip, Clementi & Co., and Collard & Collard. This extends to the serial numbers, which can be found on most of the instruments. There are often two numbers. One (10445, on the wrestplank of this piano) is usually written in ink, and is part of the series covering the grand total of all the pianos made by the firms. The other (8791) is stamped, and is the number in the series of a particular type – square pianos in this case. A comparison of these two numbers shows how important square pianos were to the firm's output. By charting the few dated examples, and by reference to other fixed points (such as change of name) the surviving pianos can be dated reasonably accurately, and we estimate that this one was made around 1812.
The pianos of Longman & Broderip were technically advanced – they were the first made in any quantity to benefit from Geib's patented escapement. We may be sure that Muzio Clementi, after taking over the firm, took a strong personal interest in the sound, as well as the looks, of pianos bearing his name.
This piano joined my little collection more than twenty years ago, and was in ‘reasonable’ condition. Most square pianos suffer from twisting of the case to some extent, and this one was no exception. It had not been restored to working order, but it did carry some unsuitable modern strings, which were much too thick, and placed the structure under too much stress. These were removed at once. Apart for some structural work to the stand, nothing else was done in those early days. Now that the time has come to restore this piano properly, it has been a pleasant surprise to find that the twist has disappeared! Undoubtedly, the fact that it has lived in an unheated (but dry) rural barn for those twenty years has helped; central heating is a great enemy of all antique furniture, especially pianos.
These ‘restoration’ notes will be continued as the work progresses.
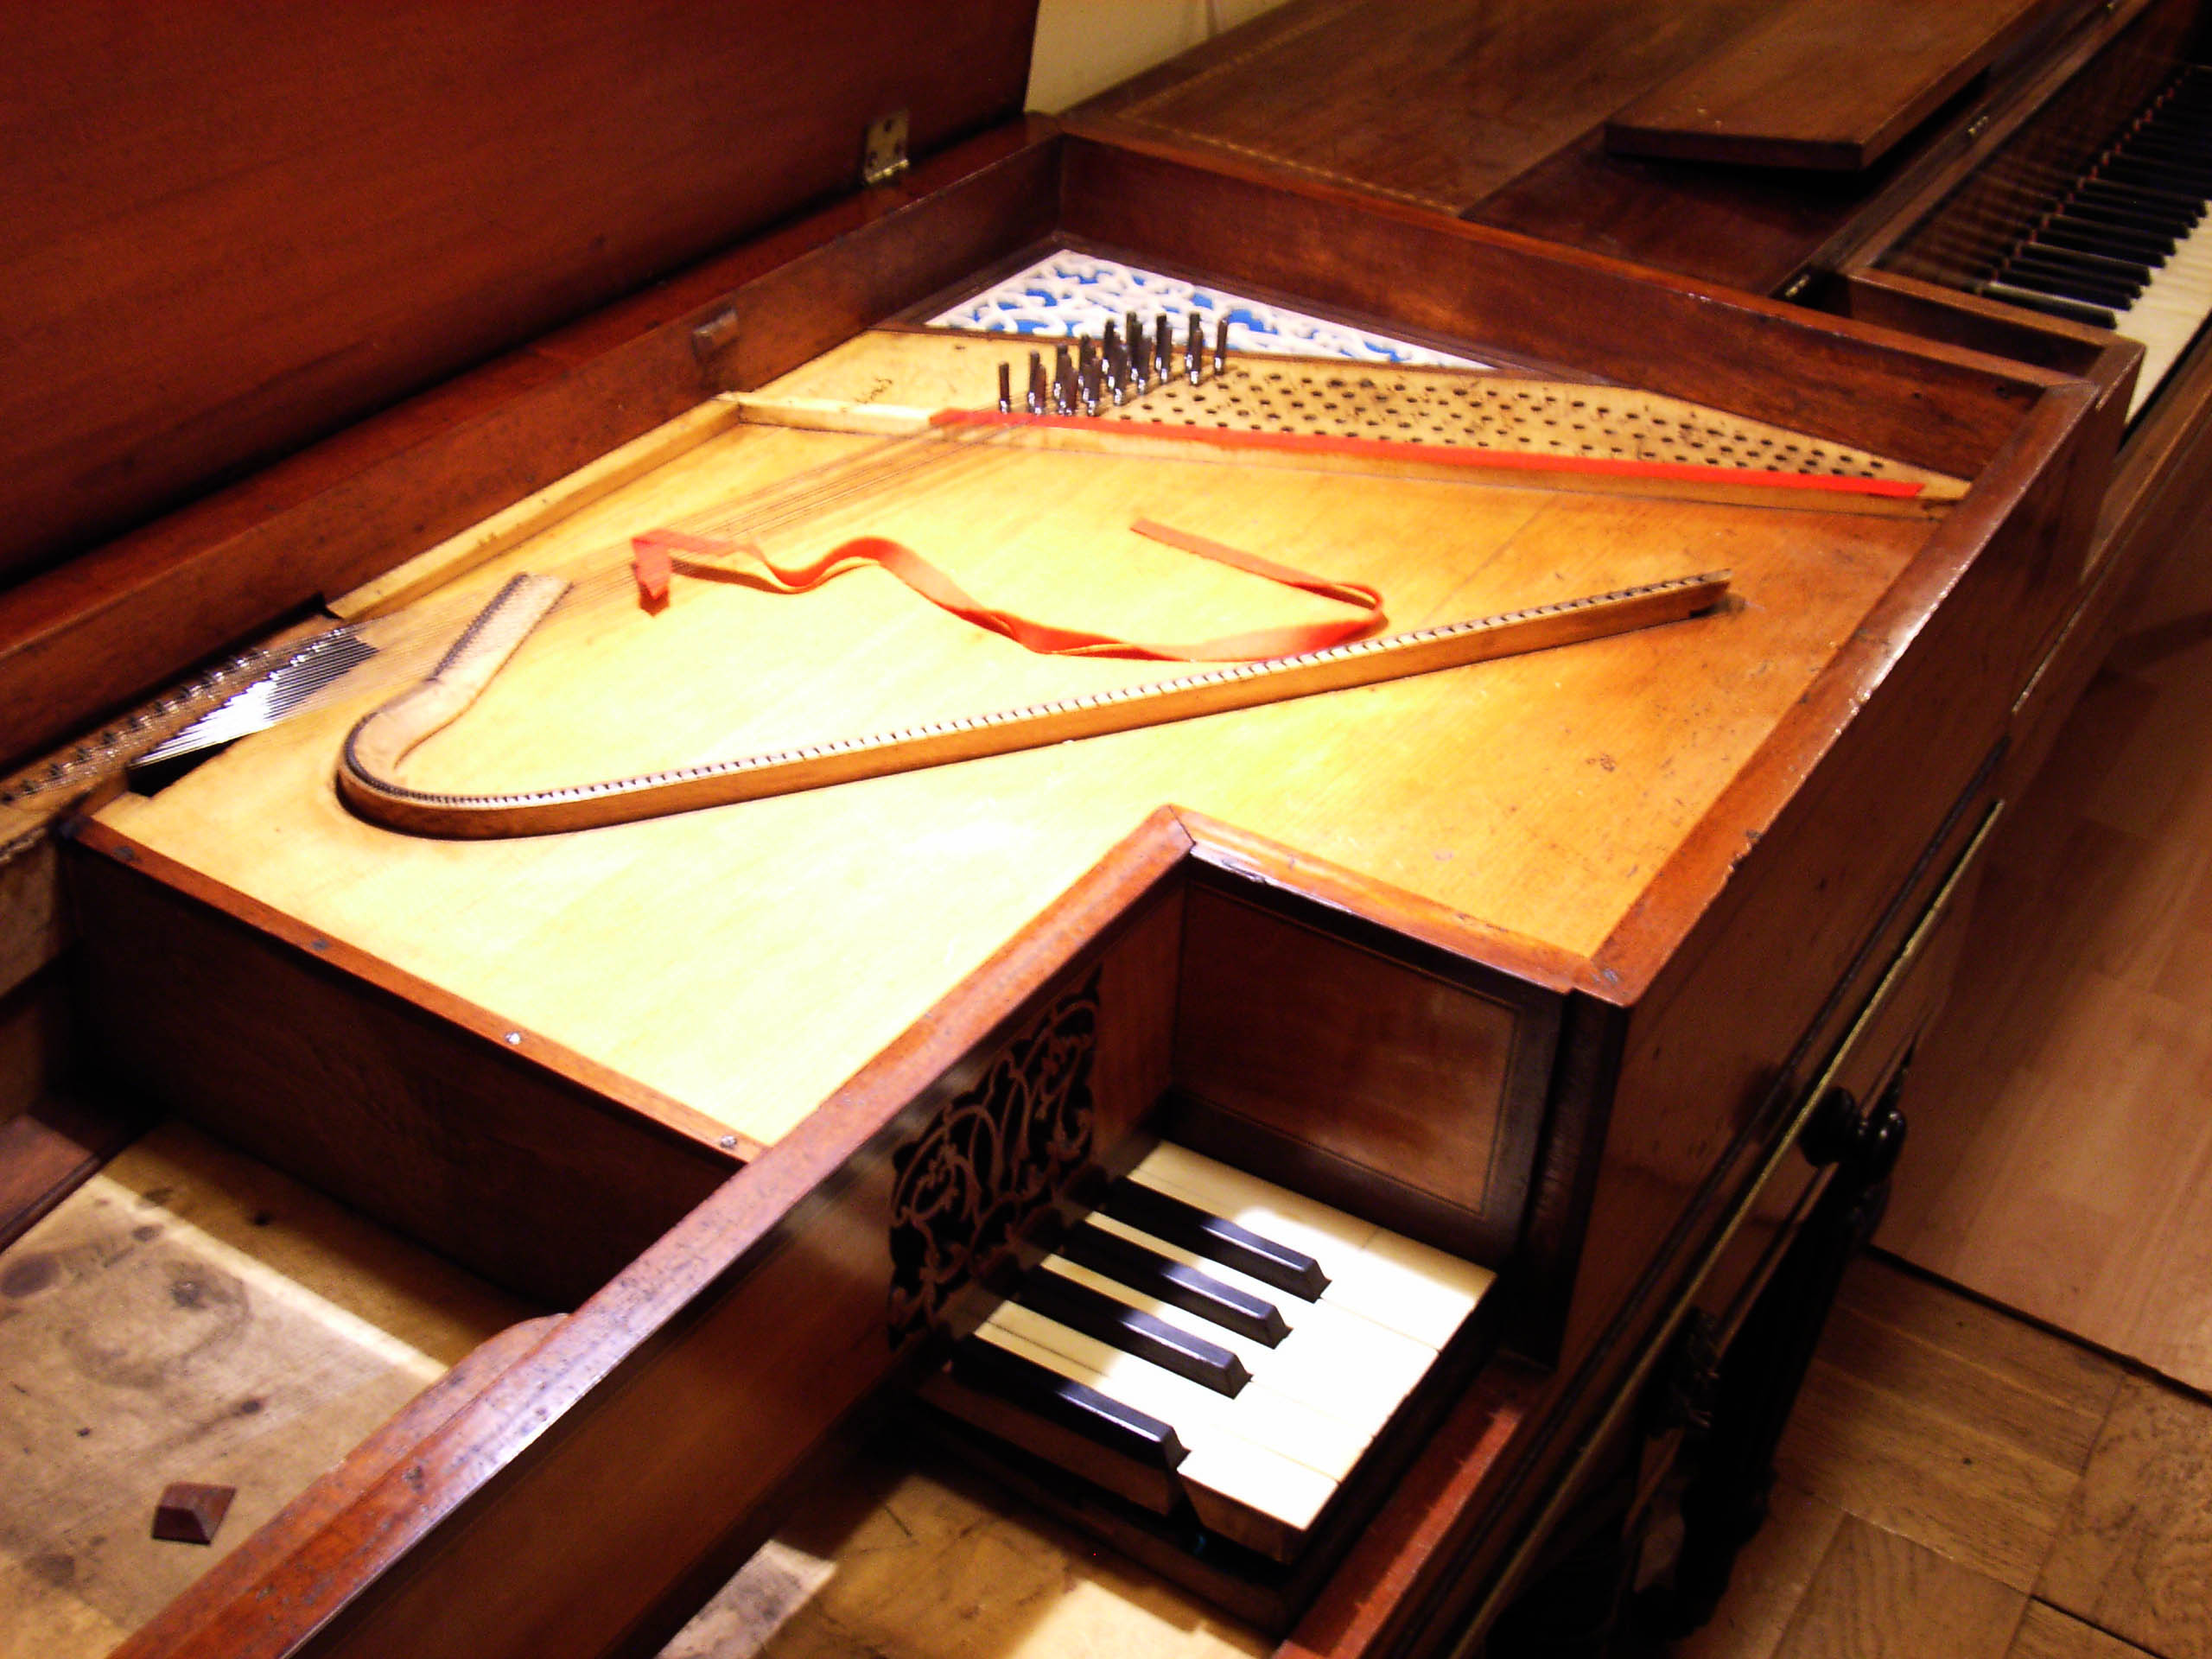
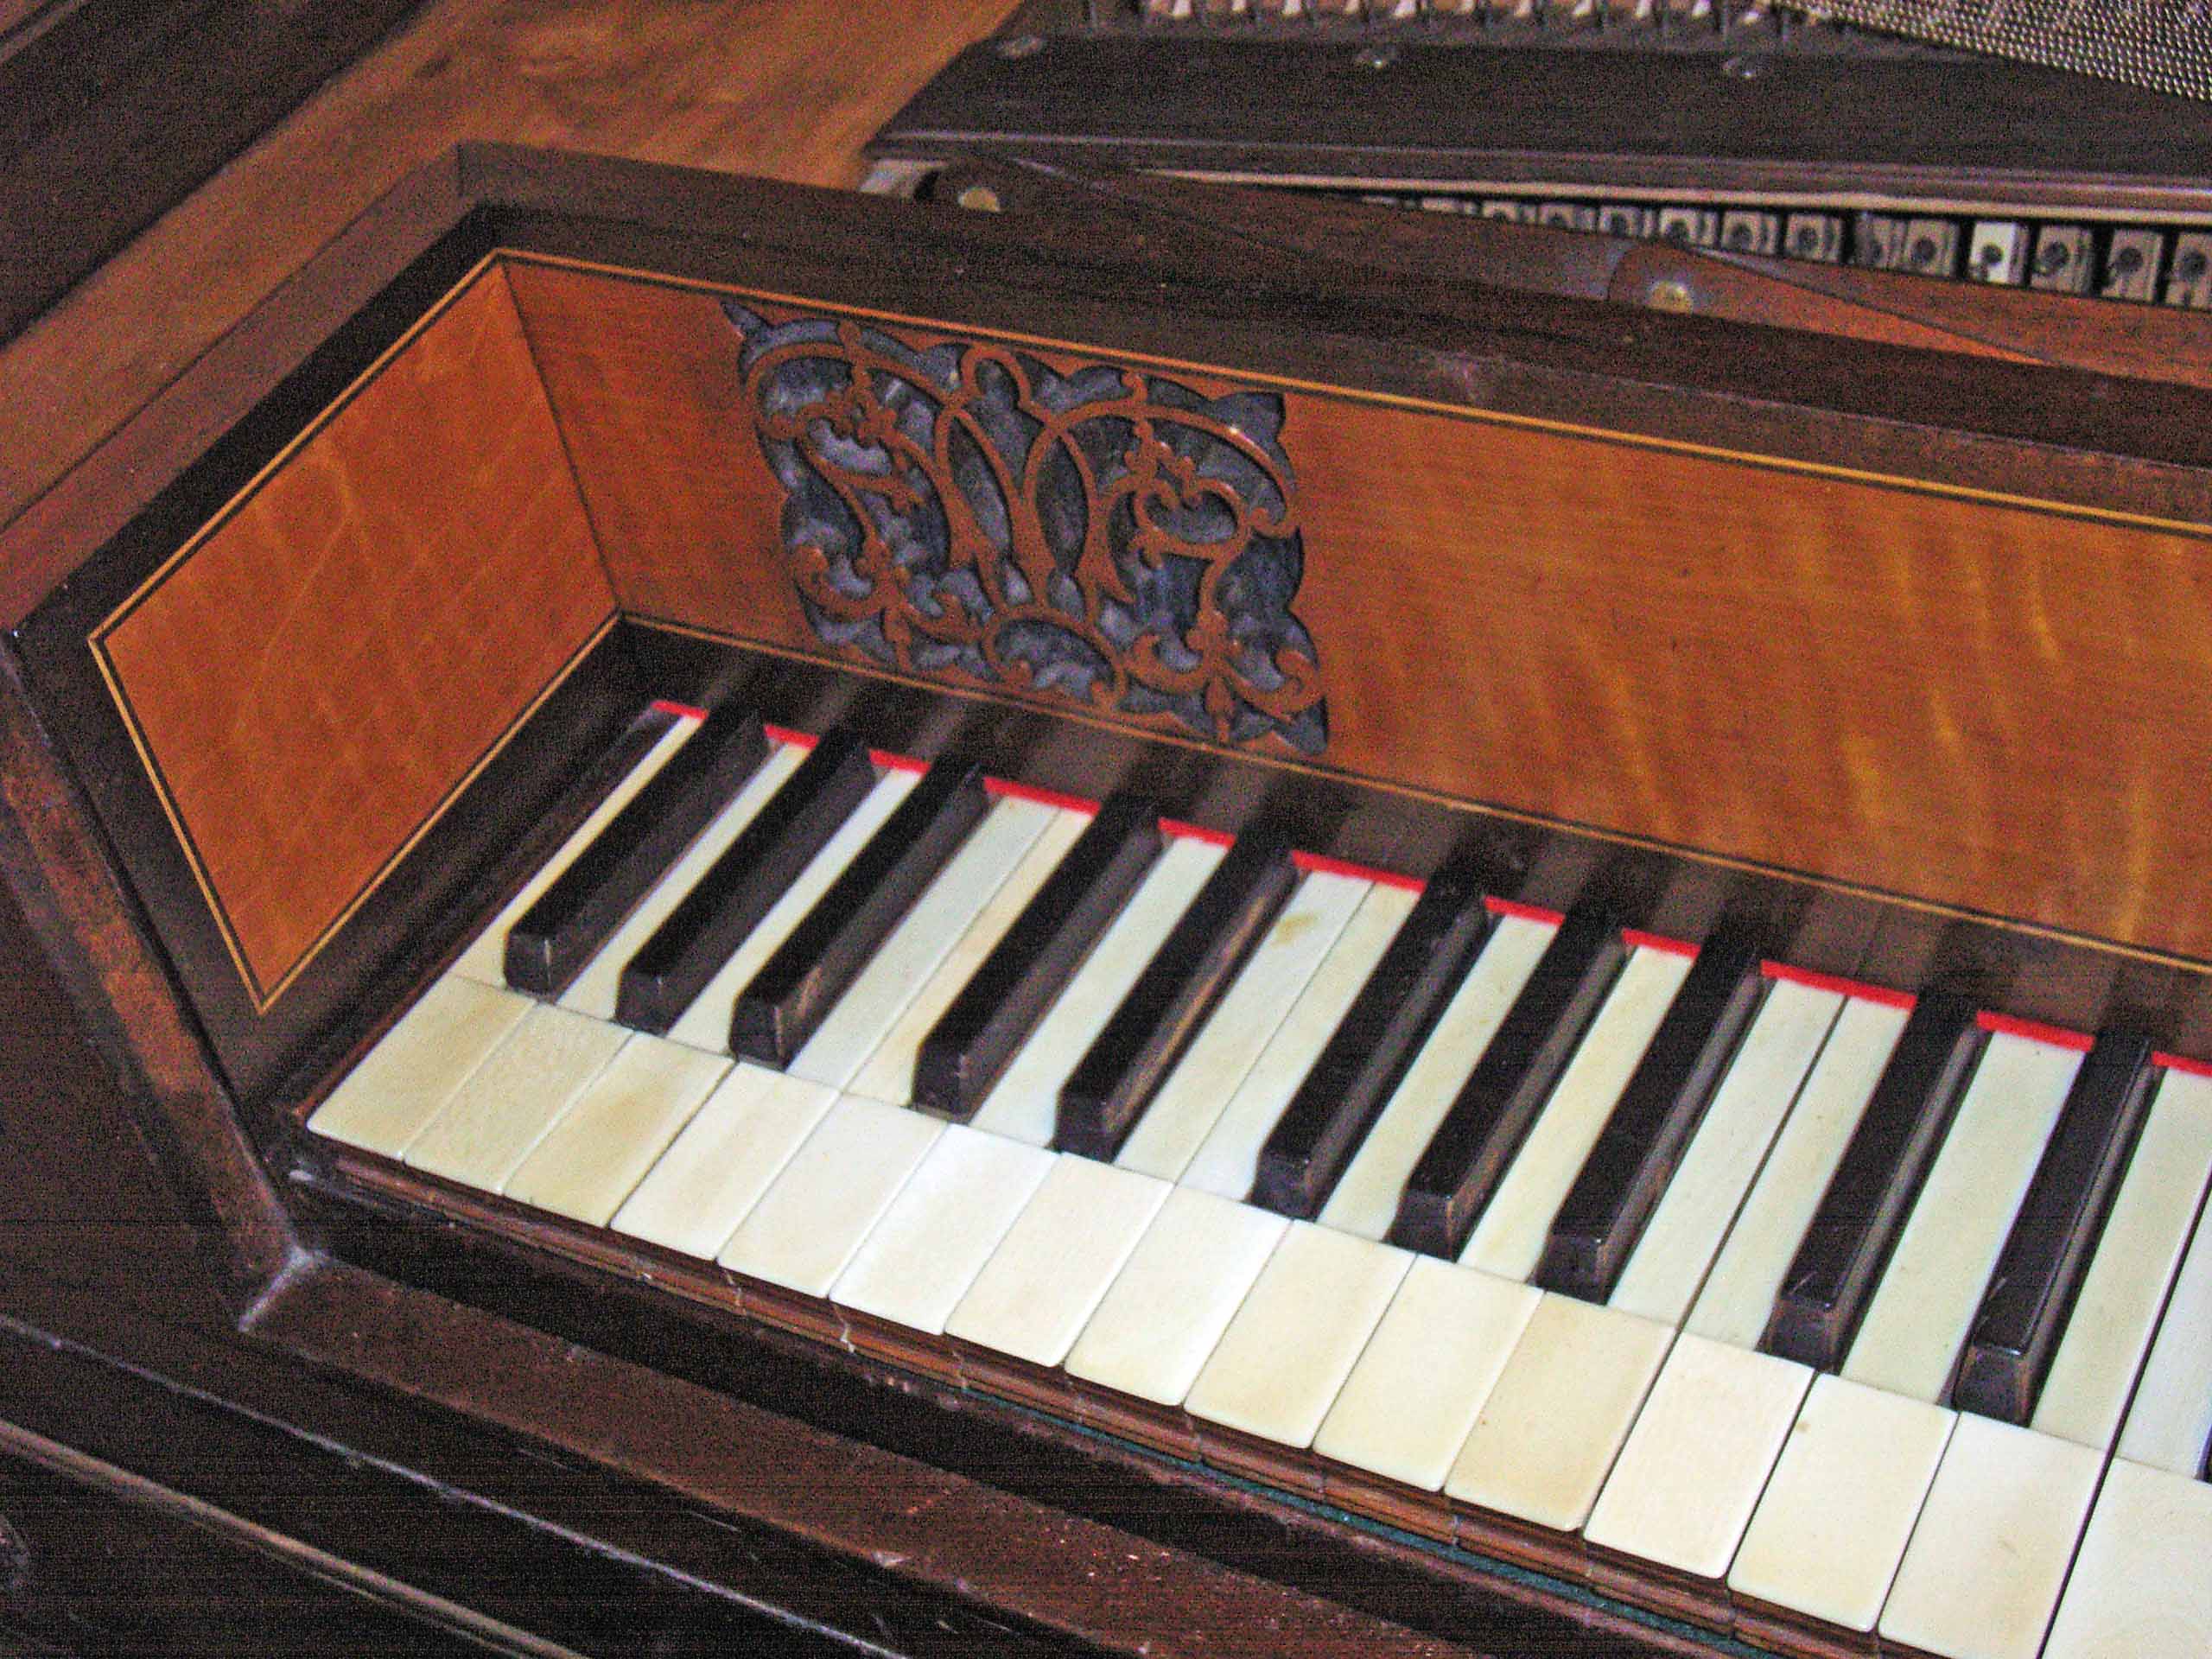
The first job (May 2007) was to remove the keys and action. Compared to most pianos, this was surprisingly difficult, because each key on this one has a ‘captive damper’, fixed directly to the rear end. Each one has to be removed individually – more about this in the next note! However, with the action removed and cleaning done, it was decided to restore the ‘extra notes’ first.
These ‘extra notes’ were an innovation made by Southwell in about 1785. The standard compass of a square piano until then (and for some years after) was five octaves, FF – f3. For reasons of acoustics, geometry, and engineering, it is not easy to extend the compass of a square piano upwards beyond this. [It is possible, however, and a few makers including Houston & Co. did achieve it by using a ‘swept’ bridge – possibly as a way of avoiding the patent.] However, it was Southwell's innovation that was most successful. It was universally adopted by the early years of the nineteenth century (by which time the patent had expired) and eventually permitted the keyboard to be extended a further full octave to f4 or even g4. This was achieved by mounting the extra keys on a separate frame, and allowing the hammers to attack the strings through a slot in the soundboard.
After cleaning, it was apparent that the hammers of this piano had been re–covered with felt – probably in the nineteenth century. However, it is sure that the original coverings would have been leather, with the ‘suede’ side towards the strings. Felt hammers were not introduced until the 1830s. A soft deerskin is being used for the new hammer coverings, over the original hard leather layers. (The core of the hammer is made from lime–wood.)
The ‘under–hammers’ – the intermediate levers that ‘escape’ from the hopper fixed to the key – needed to have their leather coverings replaced, as the originals were worn through. This has been done with a thin red leather, as near to the authentic colour as possible, and finished to the correct thickness (thanks to Harmaton Leathers, of Higham Ferrers, Northamptonshire).
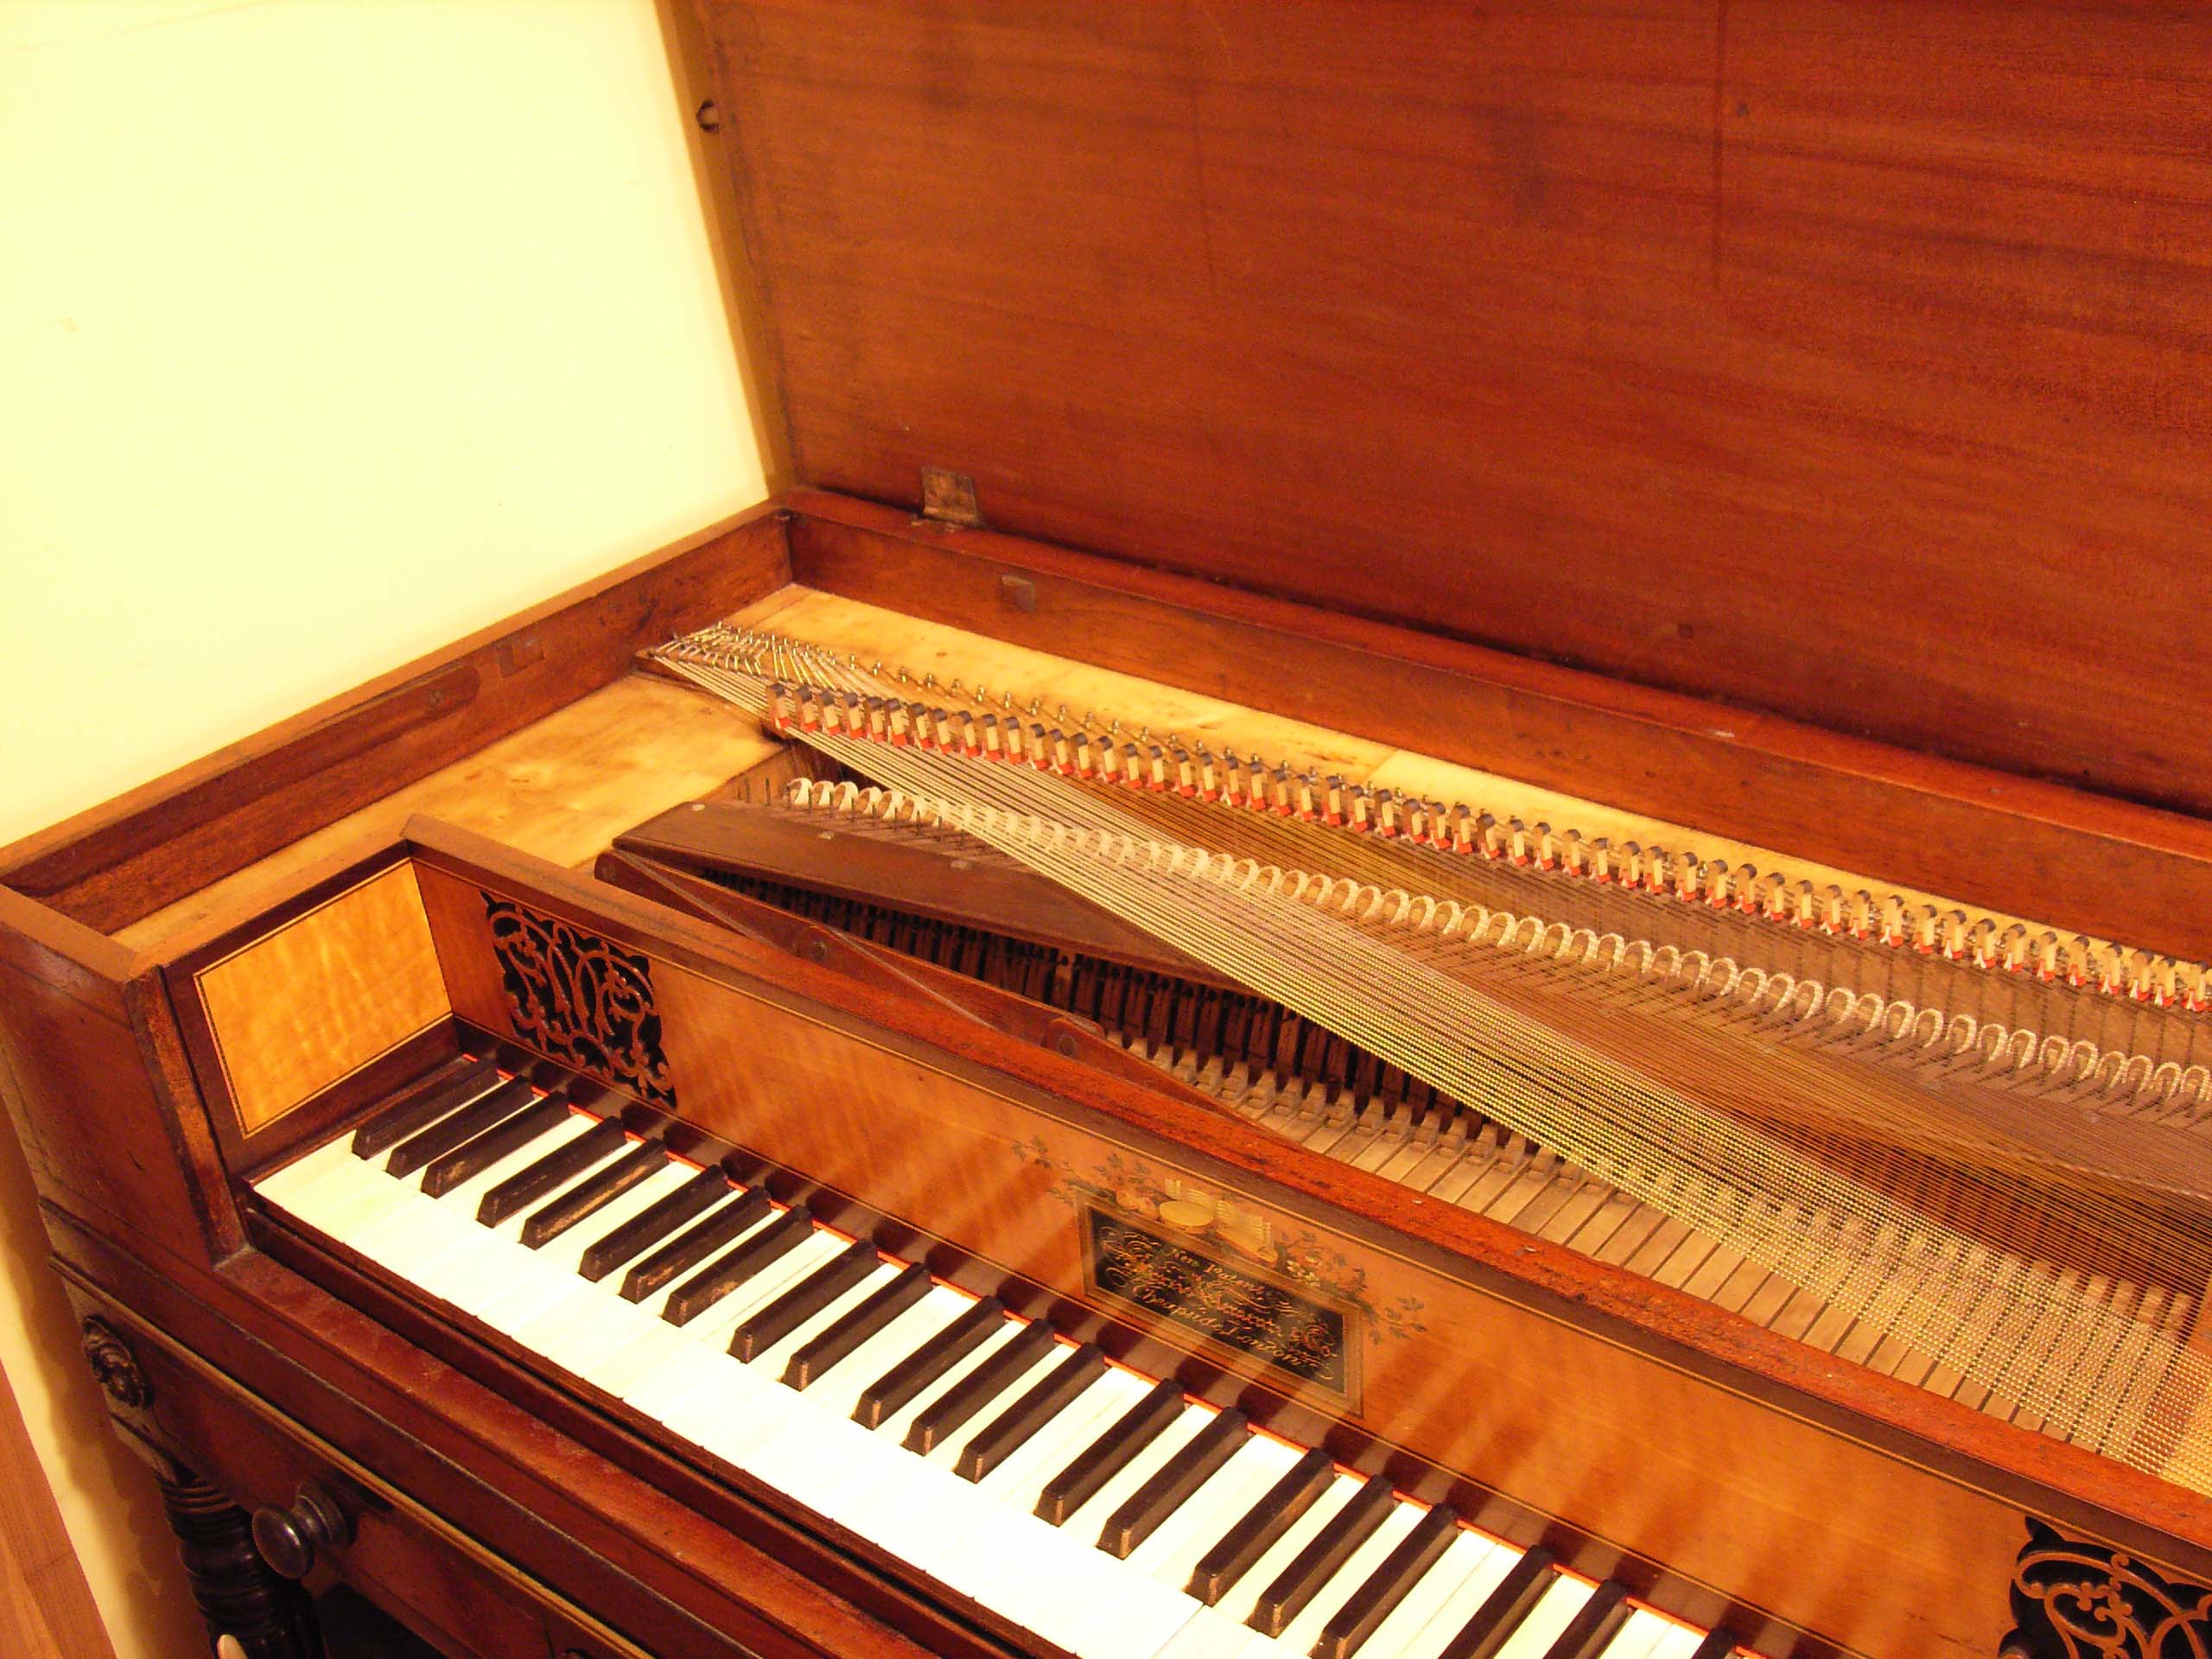
New strings were made from authentic soft iron wire, supplied by Malcolm Rose of Lewes, Sussex. Some of the wrestpins were missing; replacements have been made by hand. Ordinary iron nails provide excellent stock, but my local hardware store could not understand why I was concerned with the diameter of the nails, rather than the length! After finishing to shape on a lathe, the top ends were bashed into shape after being made red–hot. The technical term could be ‘forging’, I believe. Anyway, they now have a very convincing rustic appearance, and a nice black colour. The pins are not drilled for the ends of the strings – this was not usual until a few years later. Hitching brass or iron strings to a plain pin is a bit of a fiddle, and you may wonder why the pins were not drilled. But if you try to drill a hole through an iron pin, using tools that would have been available to you in 1800, you will know the answer to this one.
As regards the strings themselves, the stringing plan is based on data from Malcolm Rose's excellent guide, and other data. However, I am using wire up to ‘half a size’ (say 0.05 mm) thinner than the likely original fitting – this will make a significant reduction to the stress on the structure.
So, after all this, the ‘extra notes’ are back in place, and playing again. I'm happy to say that the tone is pretty good.
We await the next steps!
David
Restoration Notes – Part 2
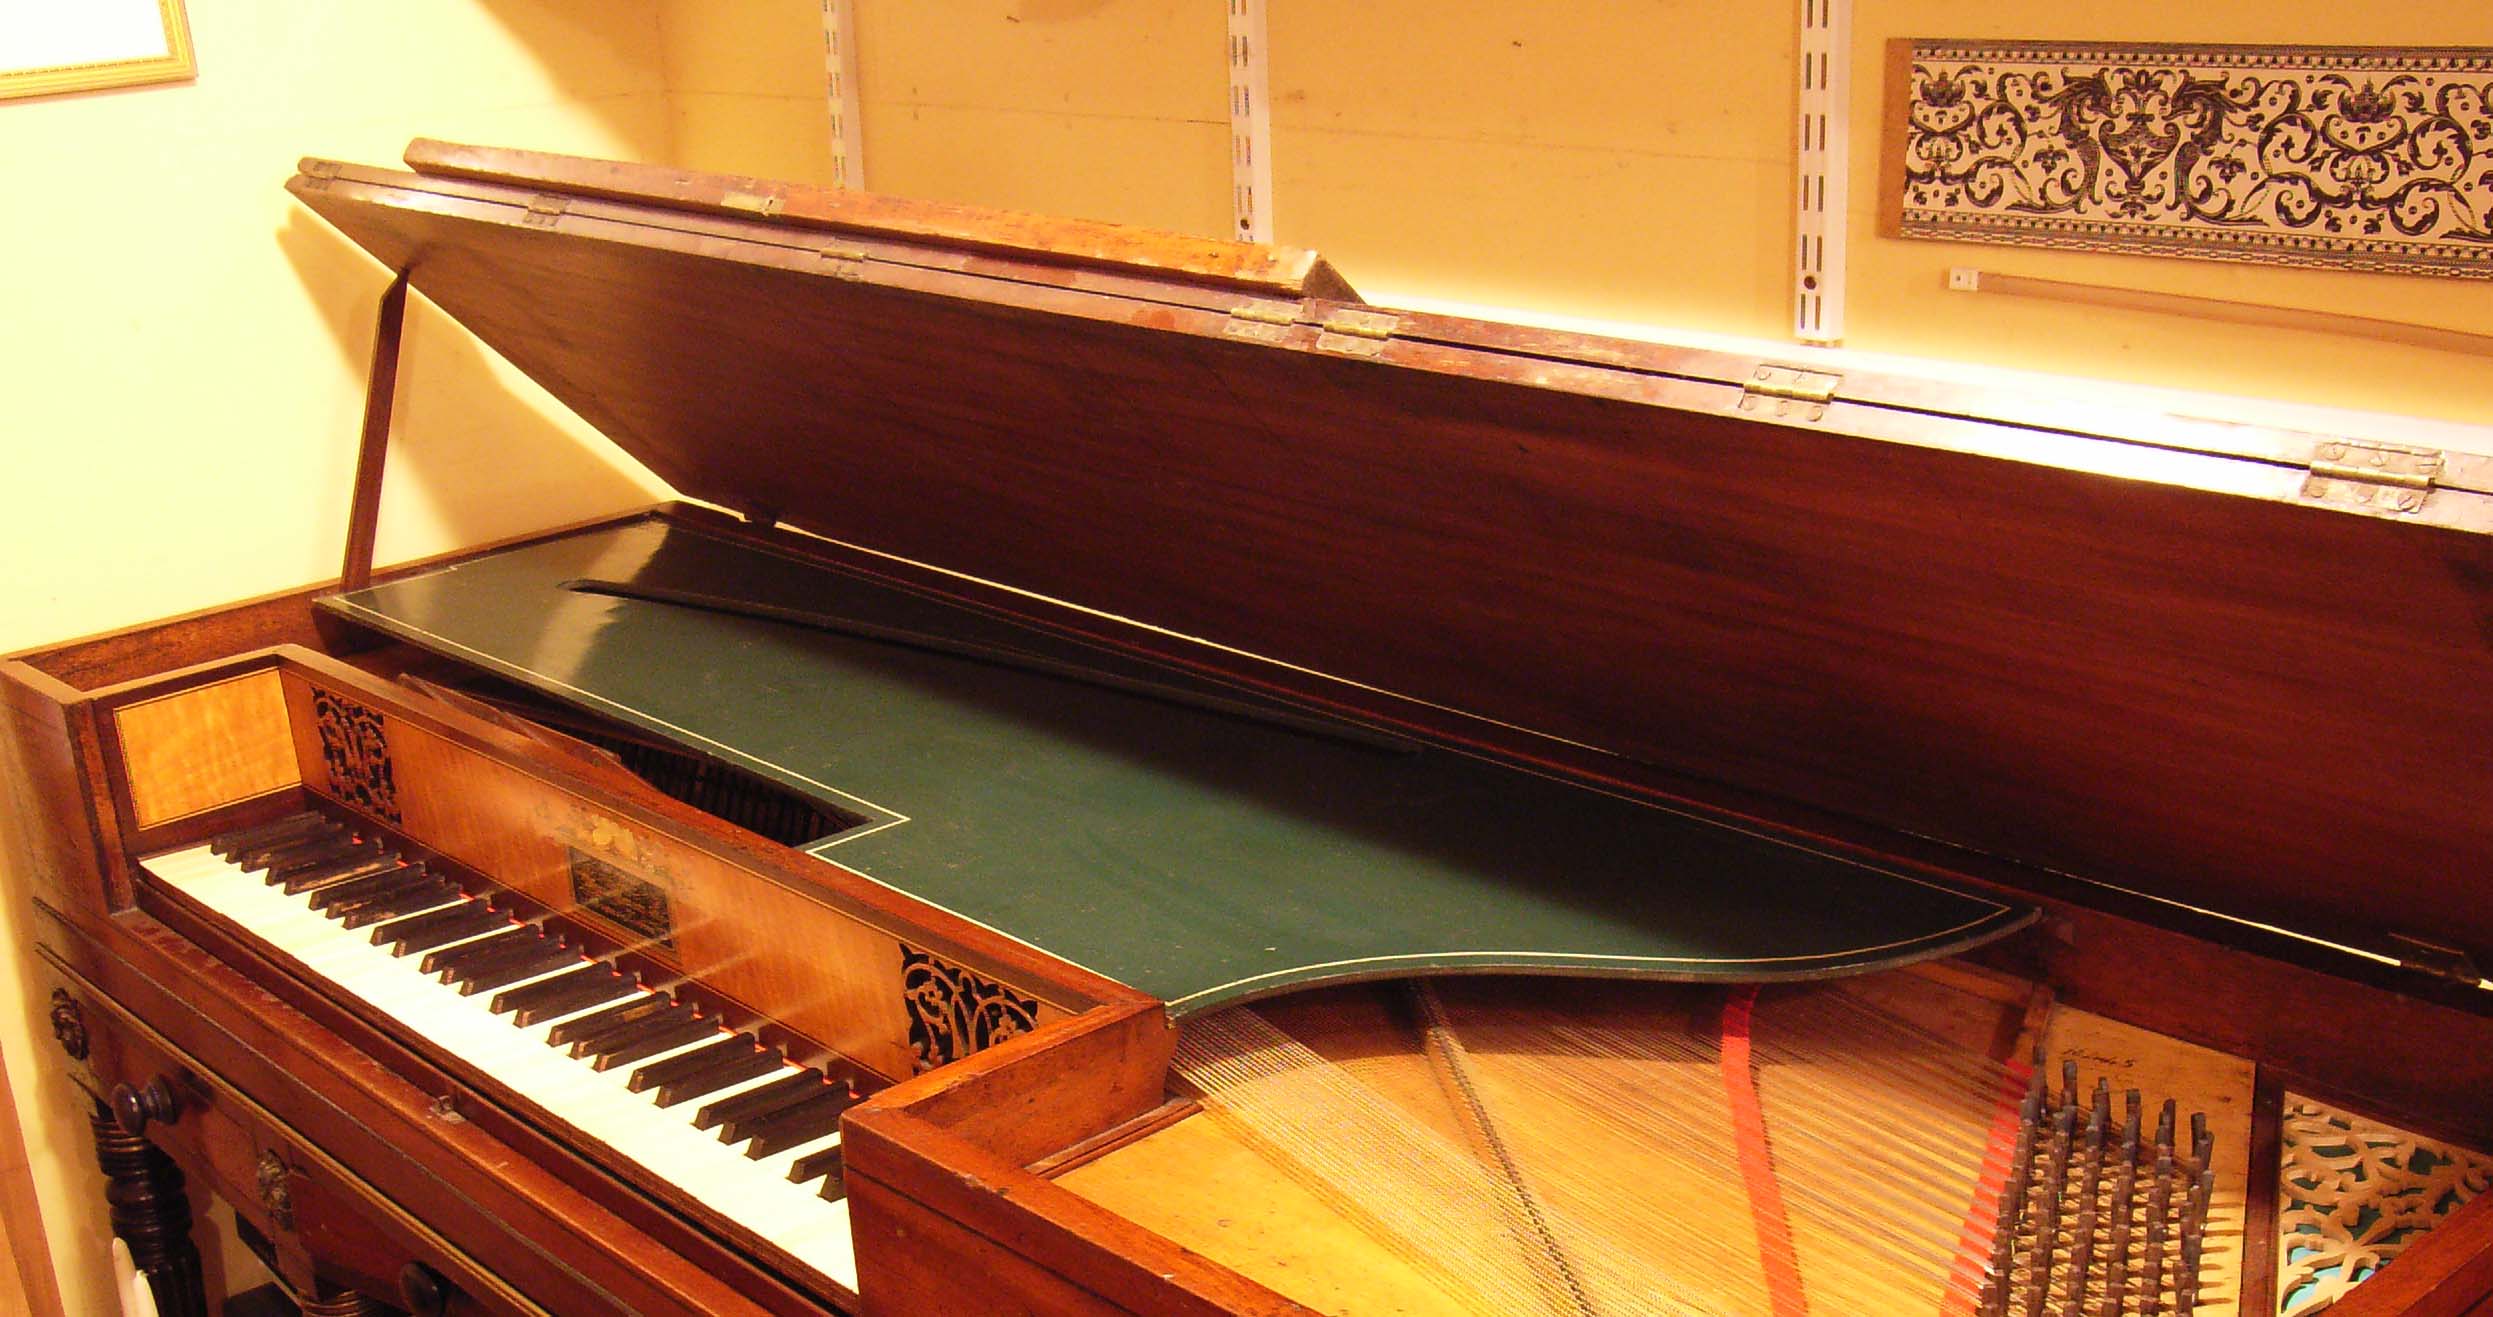
Now we move on to the main part of the Action! (That is to say the notes from bottom FF to d3 four–and–a–half octaves above, i.e. the top D in this picture)
The action of this piano (see diagram below) is based on Geib's patent escapement, for which Longman and Broderip purchased the rights. The use of this action gave their pianos a unique advantage, and this continued after Clementi took control. However, by 1812, when this piano was made, the patent had expired, and the action was in general use. It continued to be employed until the last English square pianos were made in about 1860.
Longman and Broderip were also quick to adopt Southwell's ‘Irish Dampers’, which replaced the clattery wooden lever dampers used in the early English square pianos from Zumpe onwards. In the version used on this piano, the damper (which looks like a miniaturised version of an old–fashioned clothes–peg) is directly attached to the key lever, by way of a soft buff leather pad, a drilled lime–wood dowel, and a tinned brass wire. The soft leather pad is flexible enough to allow for the change in angle as the key is depressed. The system is light, direct, and quiet. Adjustment is effected by screwing the damper up or down in the dowel – the lower end of the wire is threaded. So far, so good.
The problem starts when we try to arrange for a ‘damper lift’ pedal – as pianists were expecting by the early 1800s. The back third of the keyframe is hinged, and two rods operated by the pedal, and passing through the base–board, lift up this part of the frame, and with it the rear ends of the keys. This lifts the dampers away from the strings as intended – a spring (not shown) reverses the movement when the pedal is released. The snag is, of course, that this arrangement also causes the front of the keys to dip, and the player may find this somewhat disconcerting. This does not apply to the top notes, which have no dampers, so those keys stay where they are! Also, if the escapement is to re–engage properly when the keys are in this position, there has to be a certain amount of free–play or ‘lost motion’ when the pedal is not depressed. This sounds less than ideal, but it seems to be working out quite well in practice. The trick seems to be to adjust the dampers carefully and evenly, and then arrange for the pedal to lift them just clear of the strings. Once the dampers are in place, the action cannot be taken out for further adjustment without removing them again, so a policy of ‘right first time’ is being adopted. The key frames are firmly screwed down, and working downwards from the top means that the hammers can be removed, re–hinged, re–covered, and replaced without the strings getting in the way. The new strings for each note are put in place as the corresponding hammer is put back.
One more thing has changed; in Part 1 we started to re–cover the hammers with deerskin; there was evidence from remnants underneath the felt that this material had been used before. This sounded OK for the top notes, but after about an octave and a half (down from the top) the tone was starting to sound a bit dull. So a switch was made to a firmer vegetable–tanned goatskin (also from Harmaton Leathers), and the top notes done again. This is giving a dramatically better and brighter tone in the treble.
More to follow!
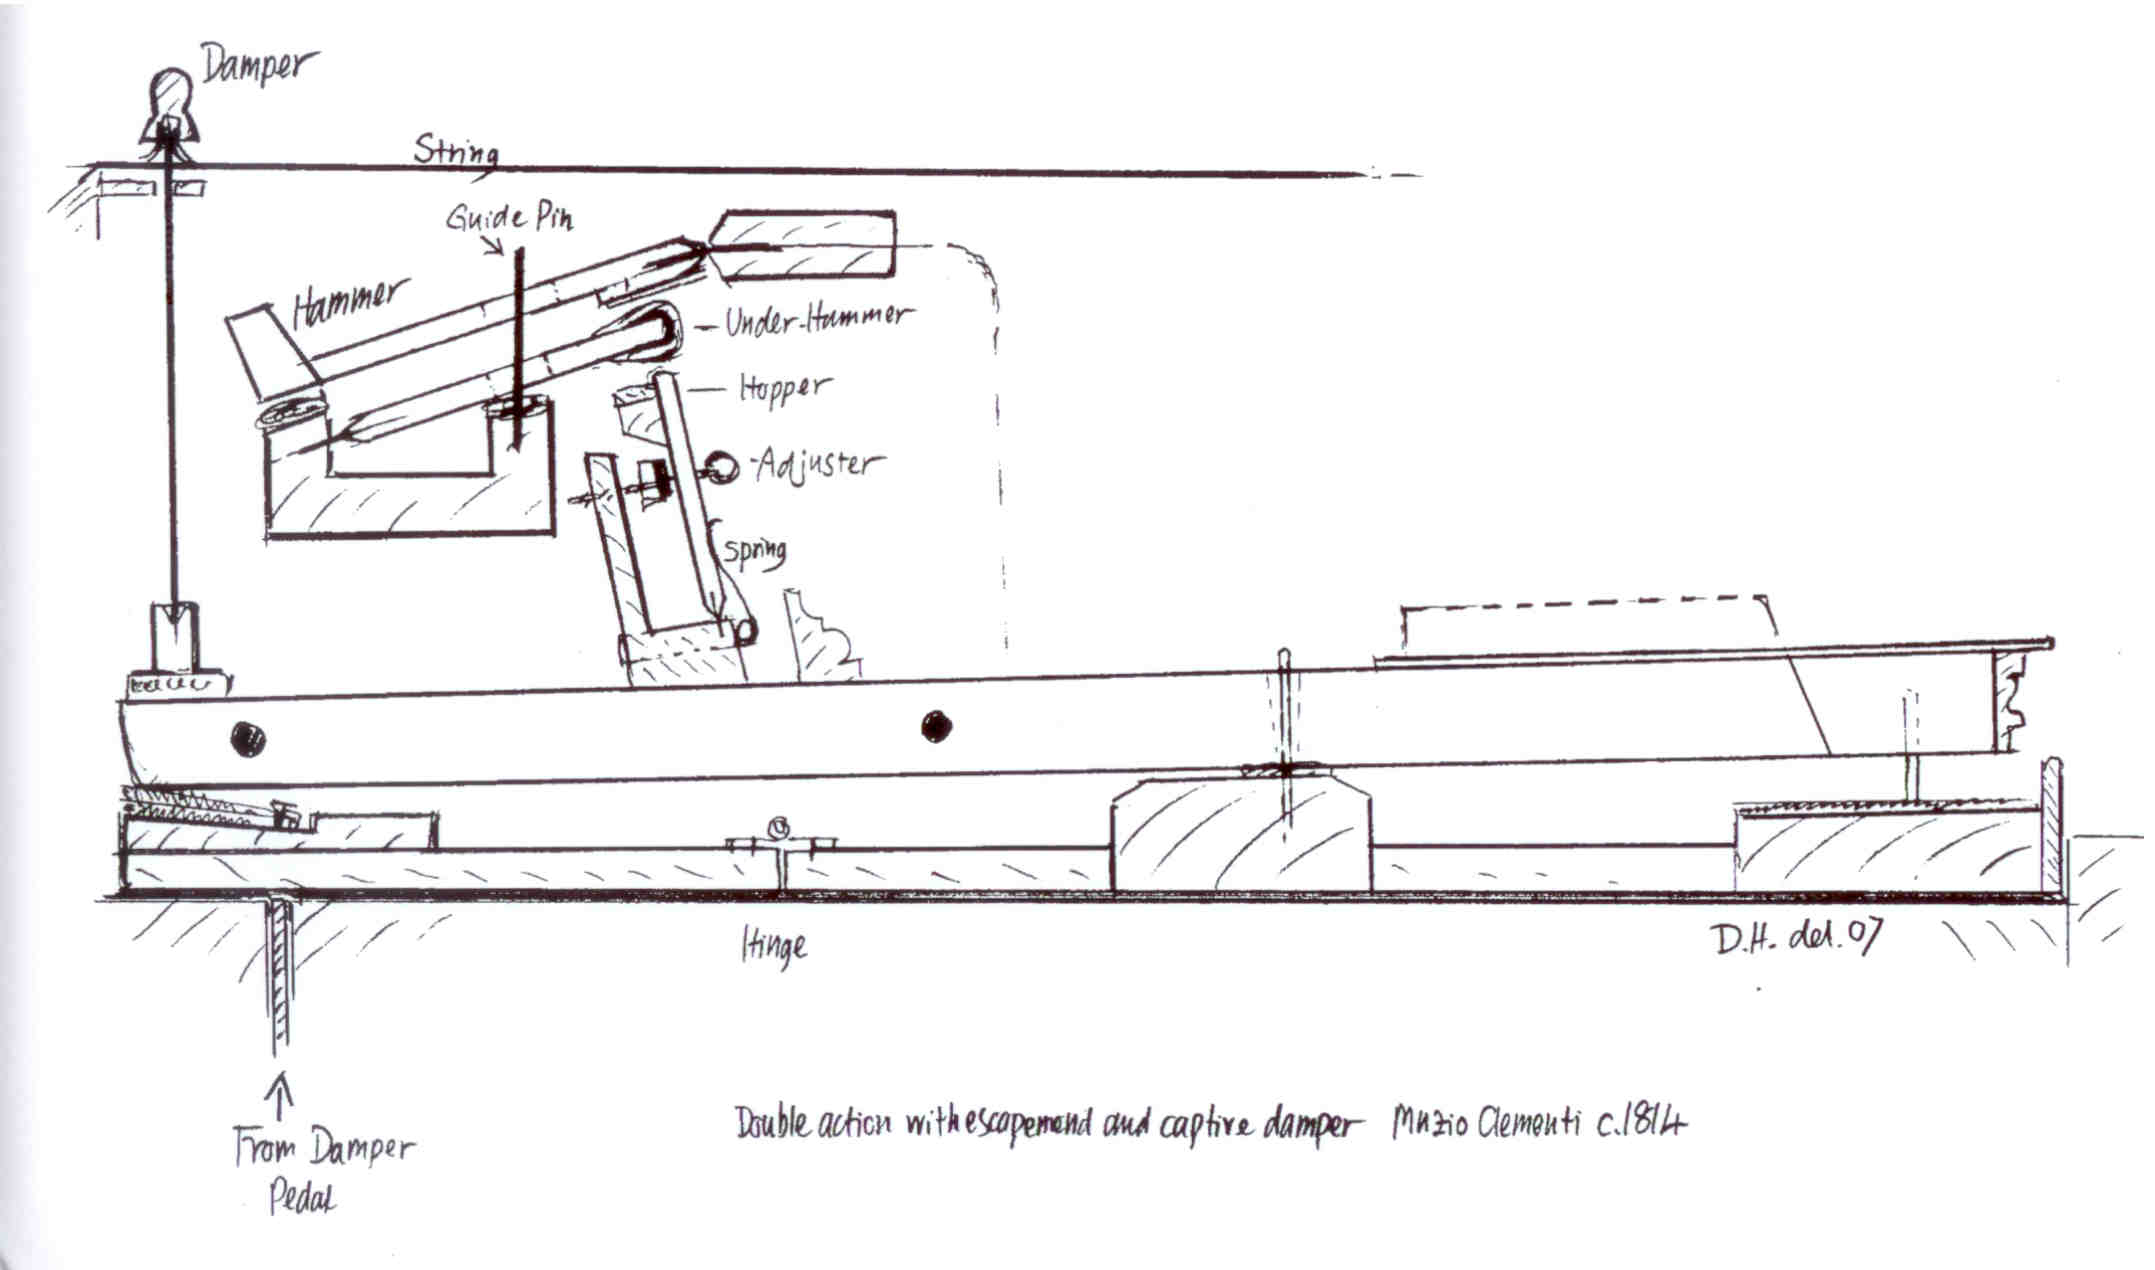
Diagram of Clementi Square Piano 8791 action, by David Hackett
Restoration Notes – Part 3
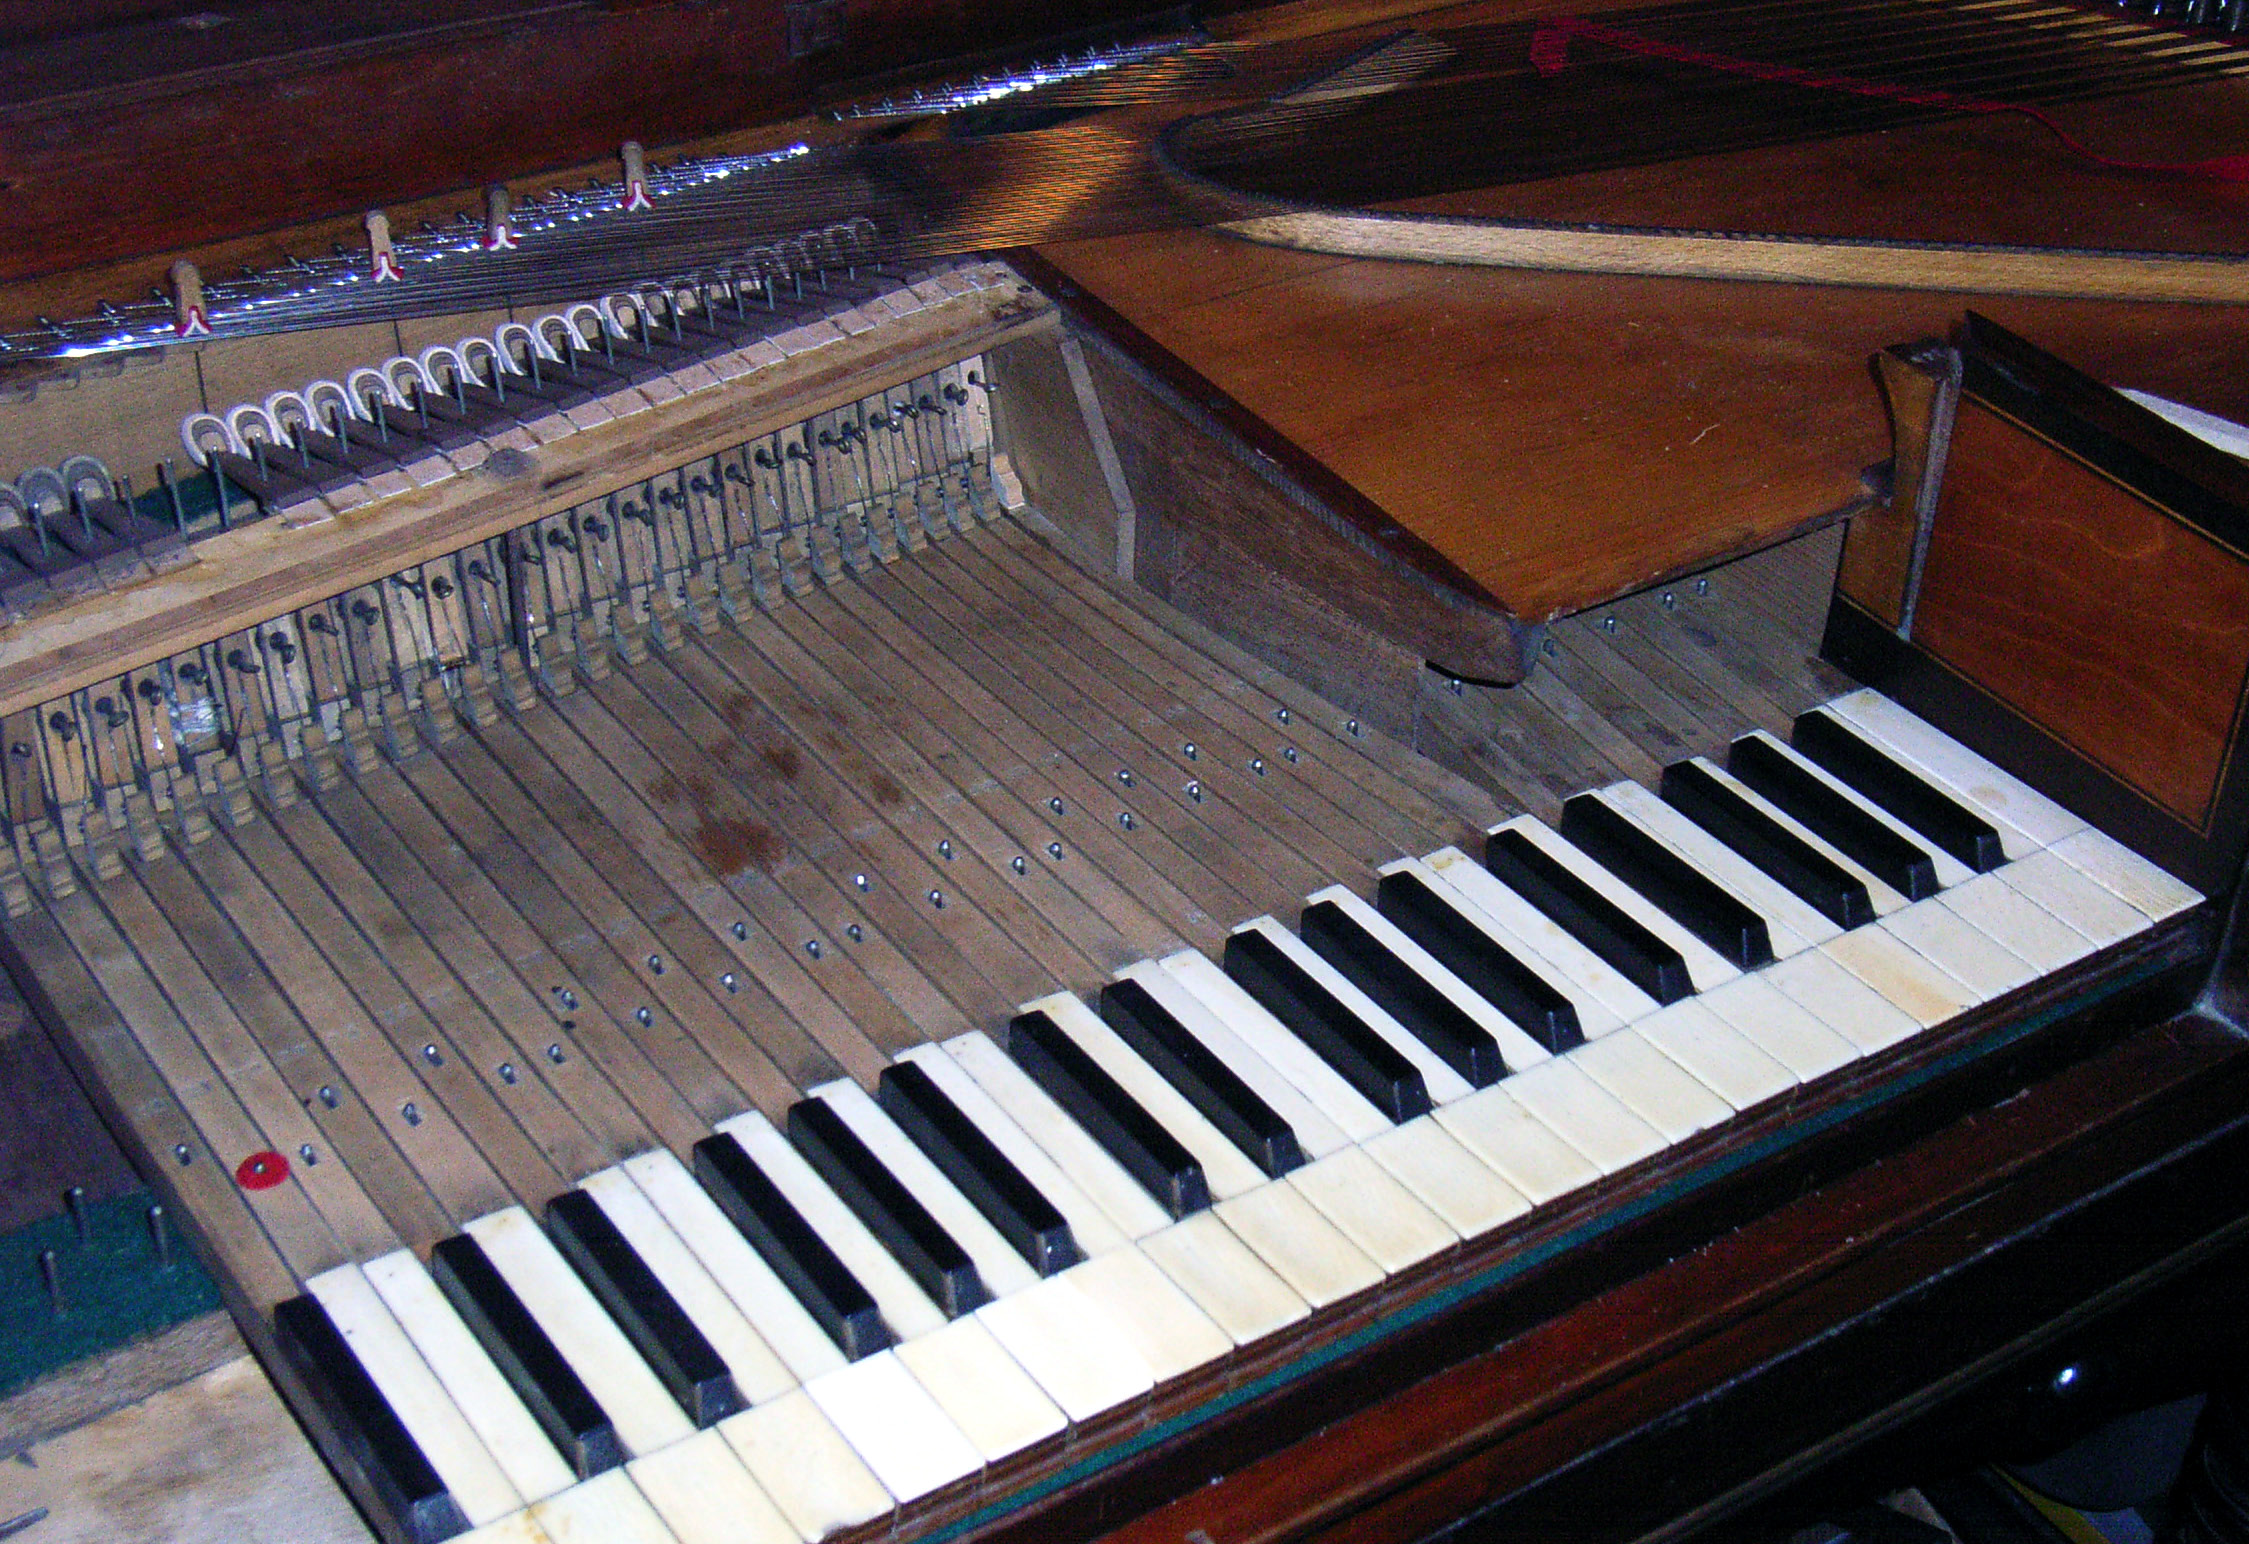
As we move on to the middle part of the compass, several of the action parts need attention. As we see in the picture, a few of the vellum hinges which allow the escapement hoppers to move have failed at some time in the past, and have been repaired with more ingenuity than skill!
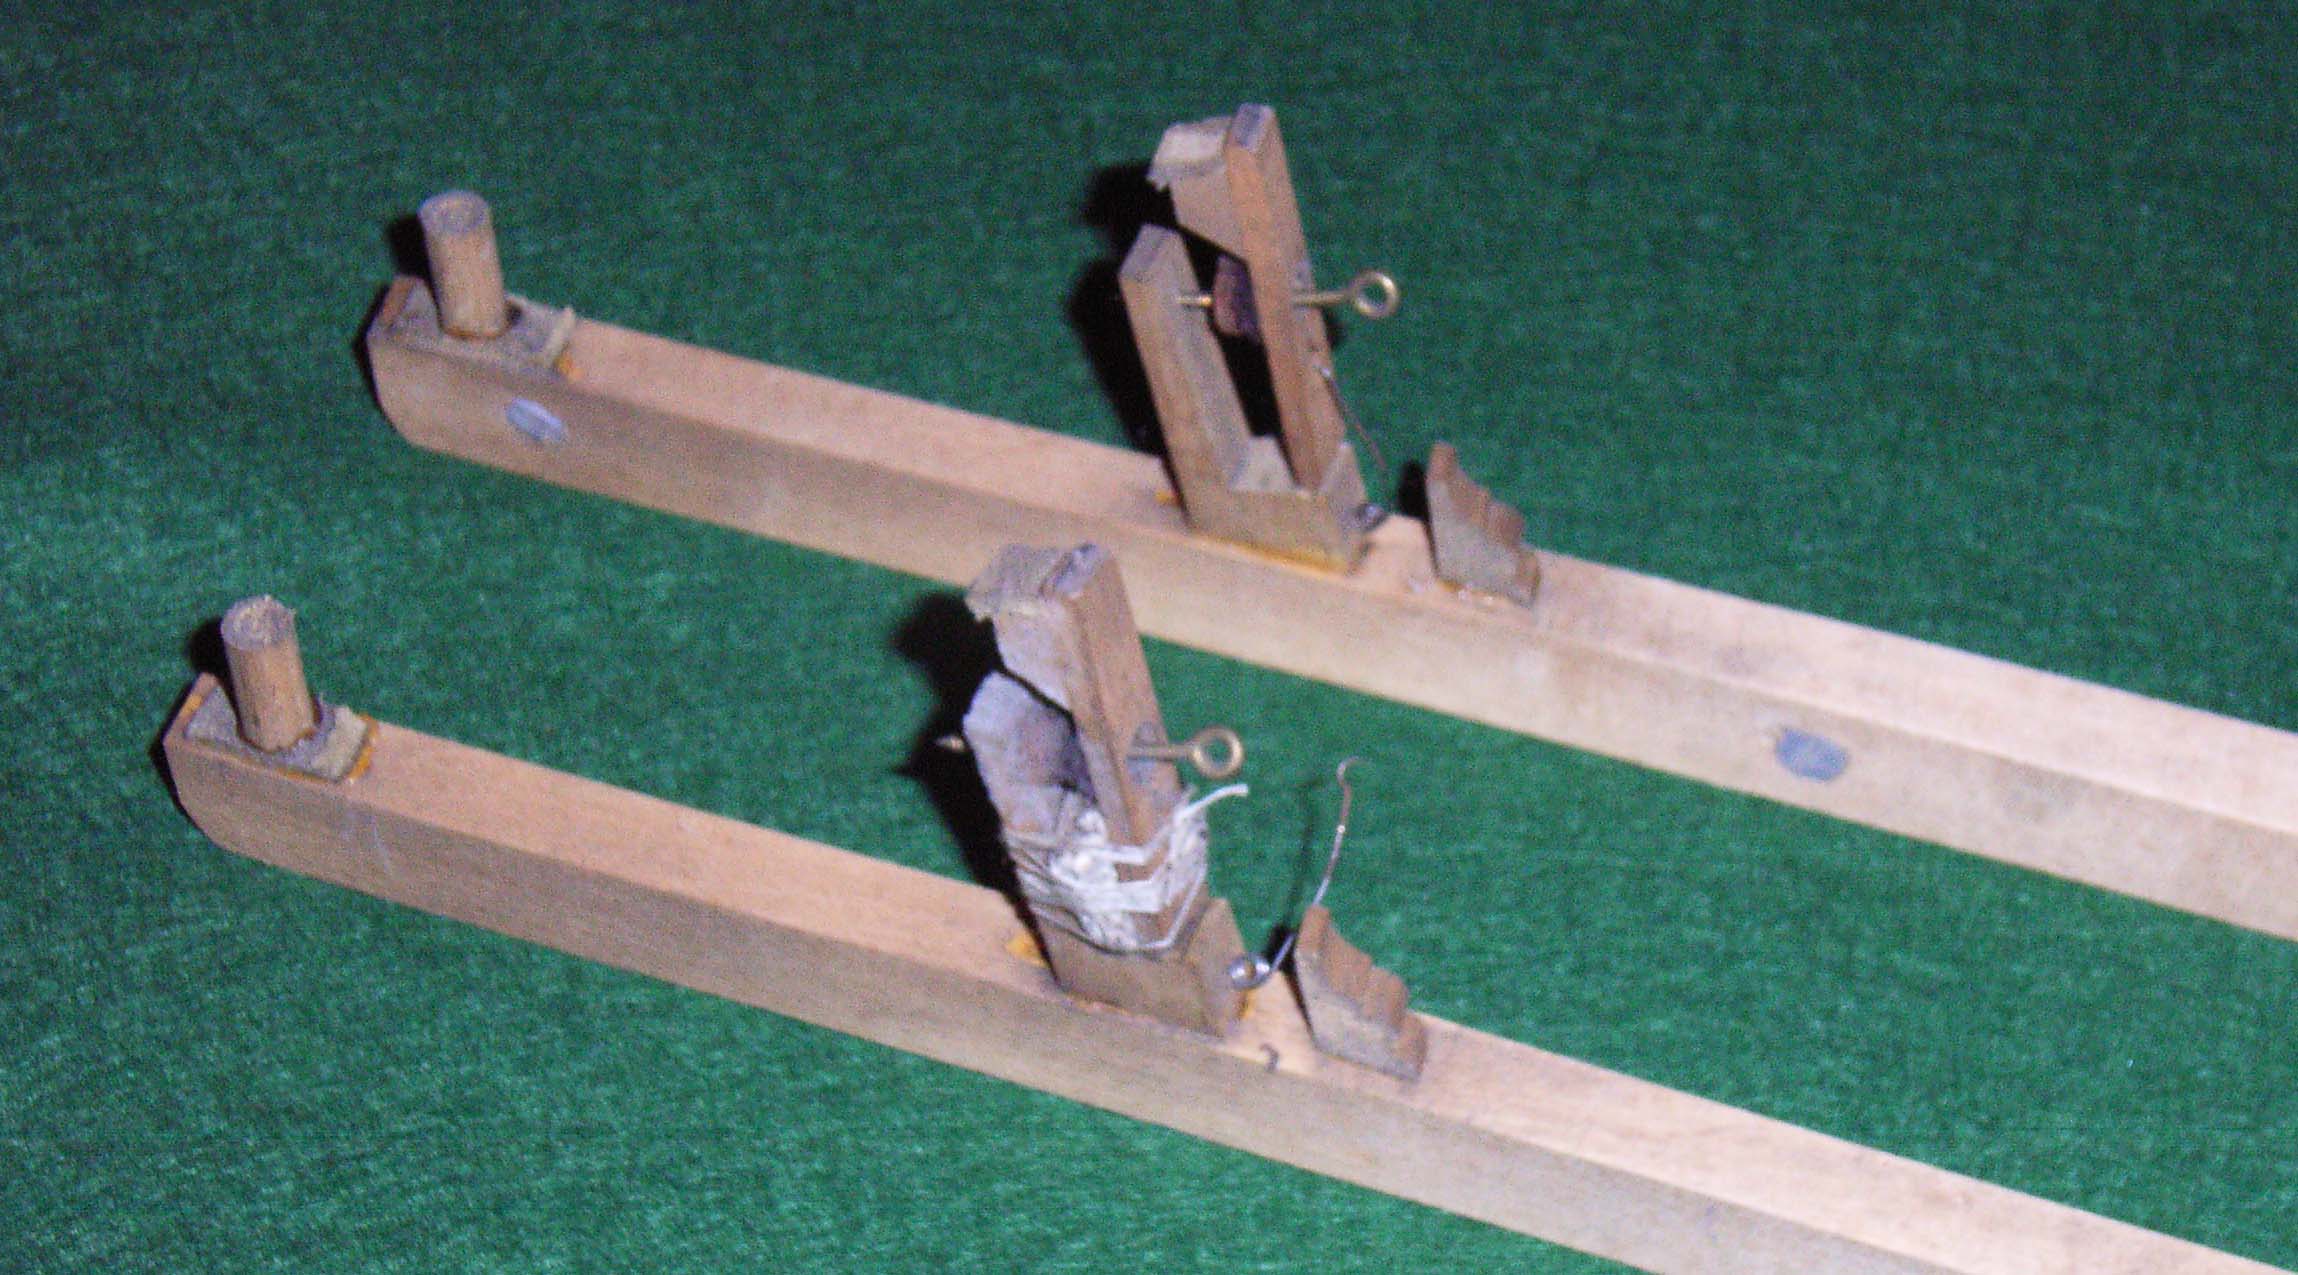
The nearer one in the picture has been repaired with a wadge of newspaper, bound with cotton. Our good friend Graham Gadd (author of The British Art Piano and Piano Design) – who had a distinguished career in Journalism – has identified the scraps of paper as mid–to–late nineteenth century, which is probably the time at which the hammers were covered with felt. Presumably the system worked more or less, as there is a certain amount of ‘give’ in the joint. However, more authentic replacement vellum hinges have been substituted now!
Otherwise, the use of vegetable–tanned goatskin for the new hammer coverings is proving to be successful from the point of view of the sound – which is after all the whole point of the thing. There is evidence that before the felt re–cover, the hammers had been faced with buff or thick chamois leather, but trials with similar material (deerskin) have produced a rather flat and dull tone – so were staying with goatskin (hair side in).
Now that the total tension is starting to mount up, the stress is causing the twist to return to a slight extent. However, it is not noticeable unless you are really looking, and does not interfere with the works at all. Such twisting is very common for square pianos of this date, and we are hoping that the twist in this one will remain manageable. The problem – caused by the higher tension as thicker strings were used – was finally controlled by the introduction of iron bracings and bars.
We are now down to the bottom octave but one, i.e. from the f in the bass clef to the F just below the staff, and have switched to brass for these strings, and then to red brass (all from Malcolm Rose). Red brass was quite usual until at least the later 1820s. My view is that as long as it does not break, red brass gives a richer tone and a clearer focus for the pitch.
The time has come to re-instate the pedal and its mechanism, and to relate this to the action.
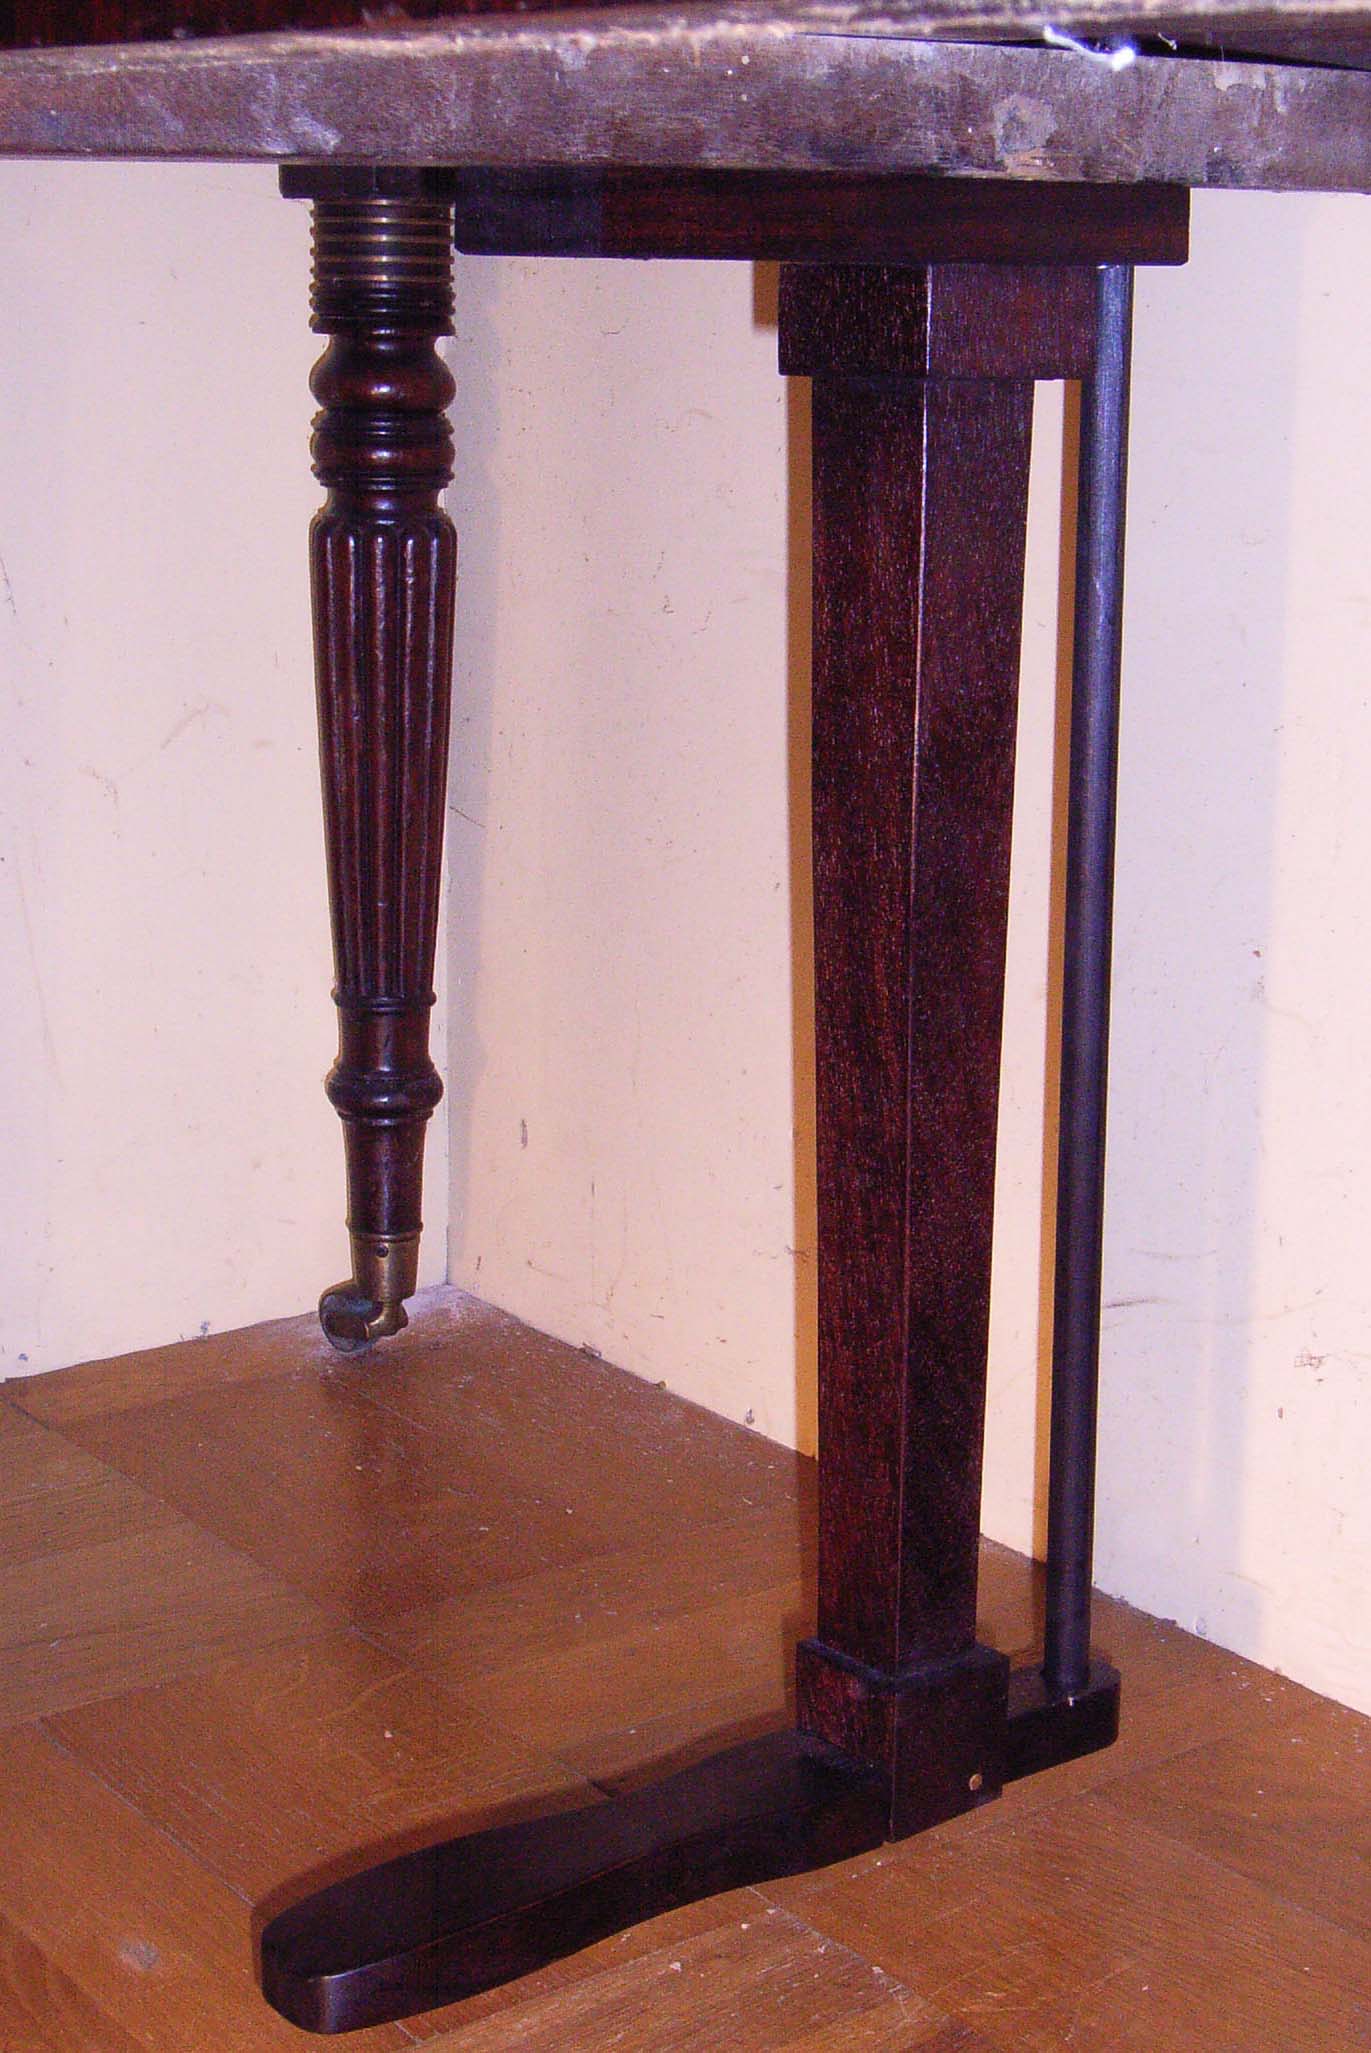
Missing pedal–legs are very common on surviving early square pianos. There is no doubt that the original in this case was a turned and reeded leg, like the one in the background. The remnants of the tapped thread in the stand confirm this. Now, at a push, I could manage the turning, but the reeding bit is something else, and I have other things to do (like feeding the cats and shopping). So, this piano now has a rectangular–section pedal leg (there are plenty of precedents for this, by the way). The good thing is that I have got the gearing ratios about right, so it works properly!
The really good news is that the whole system of damper–raising, accompanied by a dip of the keys, is far less worrying than I expected. And the delicate and direct touch is delightful. True, it will be very difficult to remove the action to fiddle about with it (once the dampers are in place) – but who wants to do this anyway?
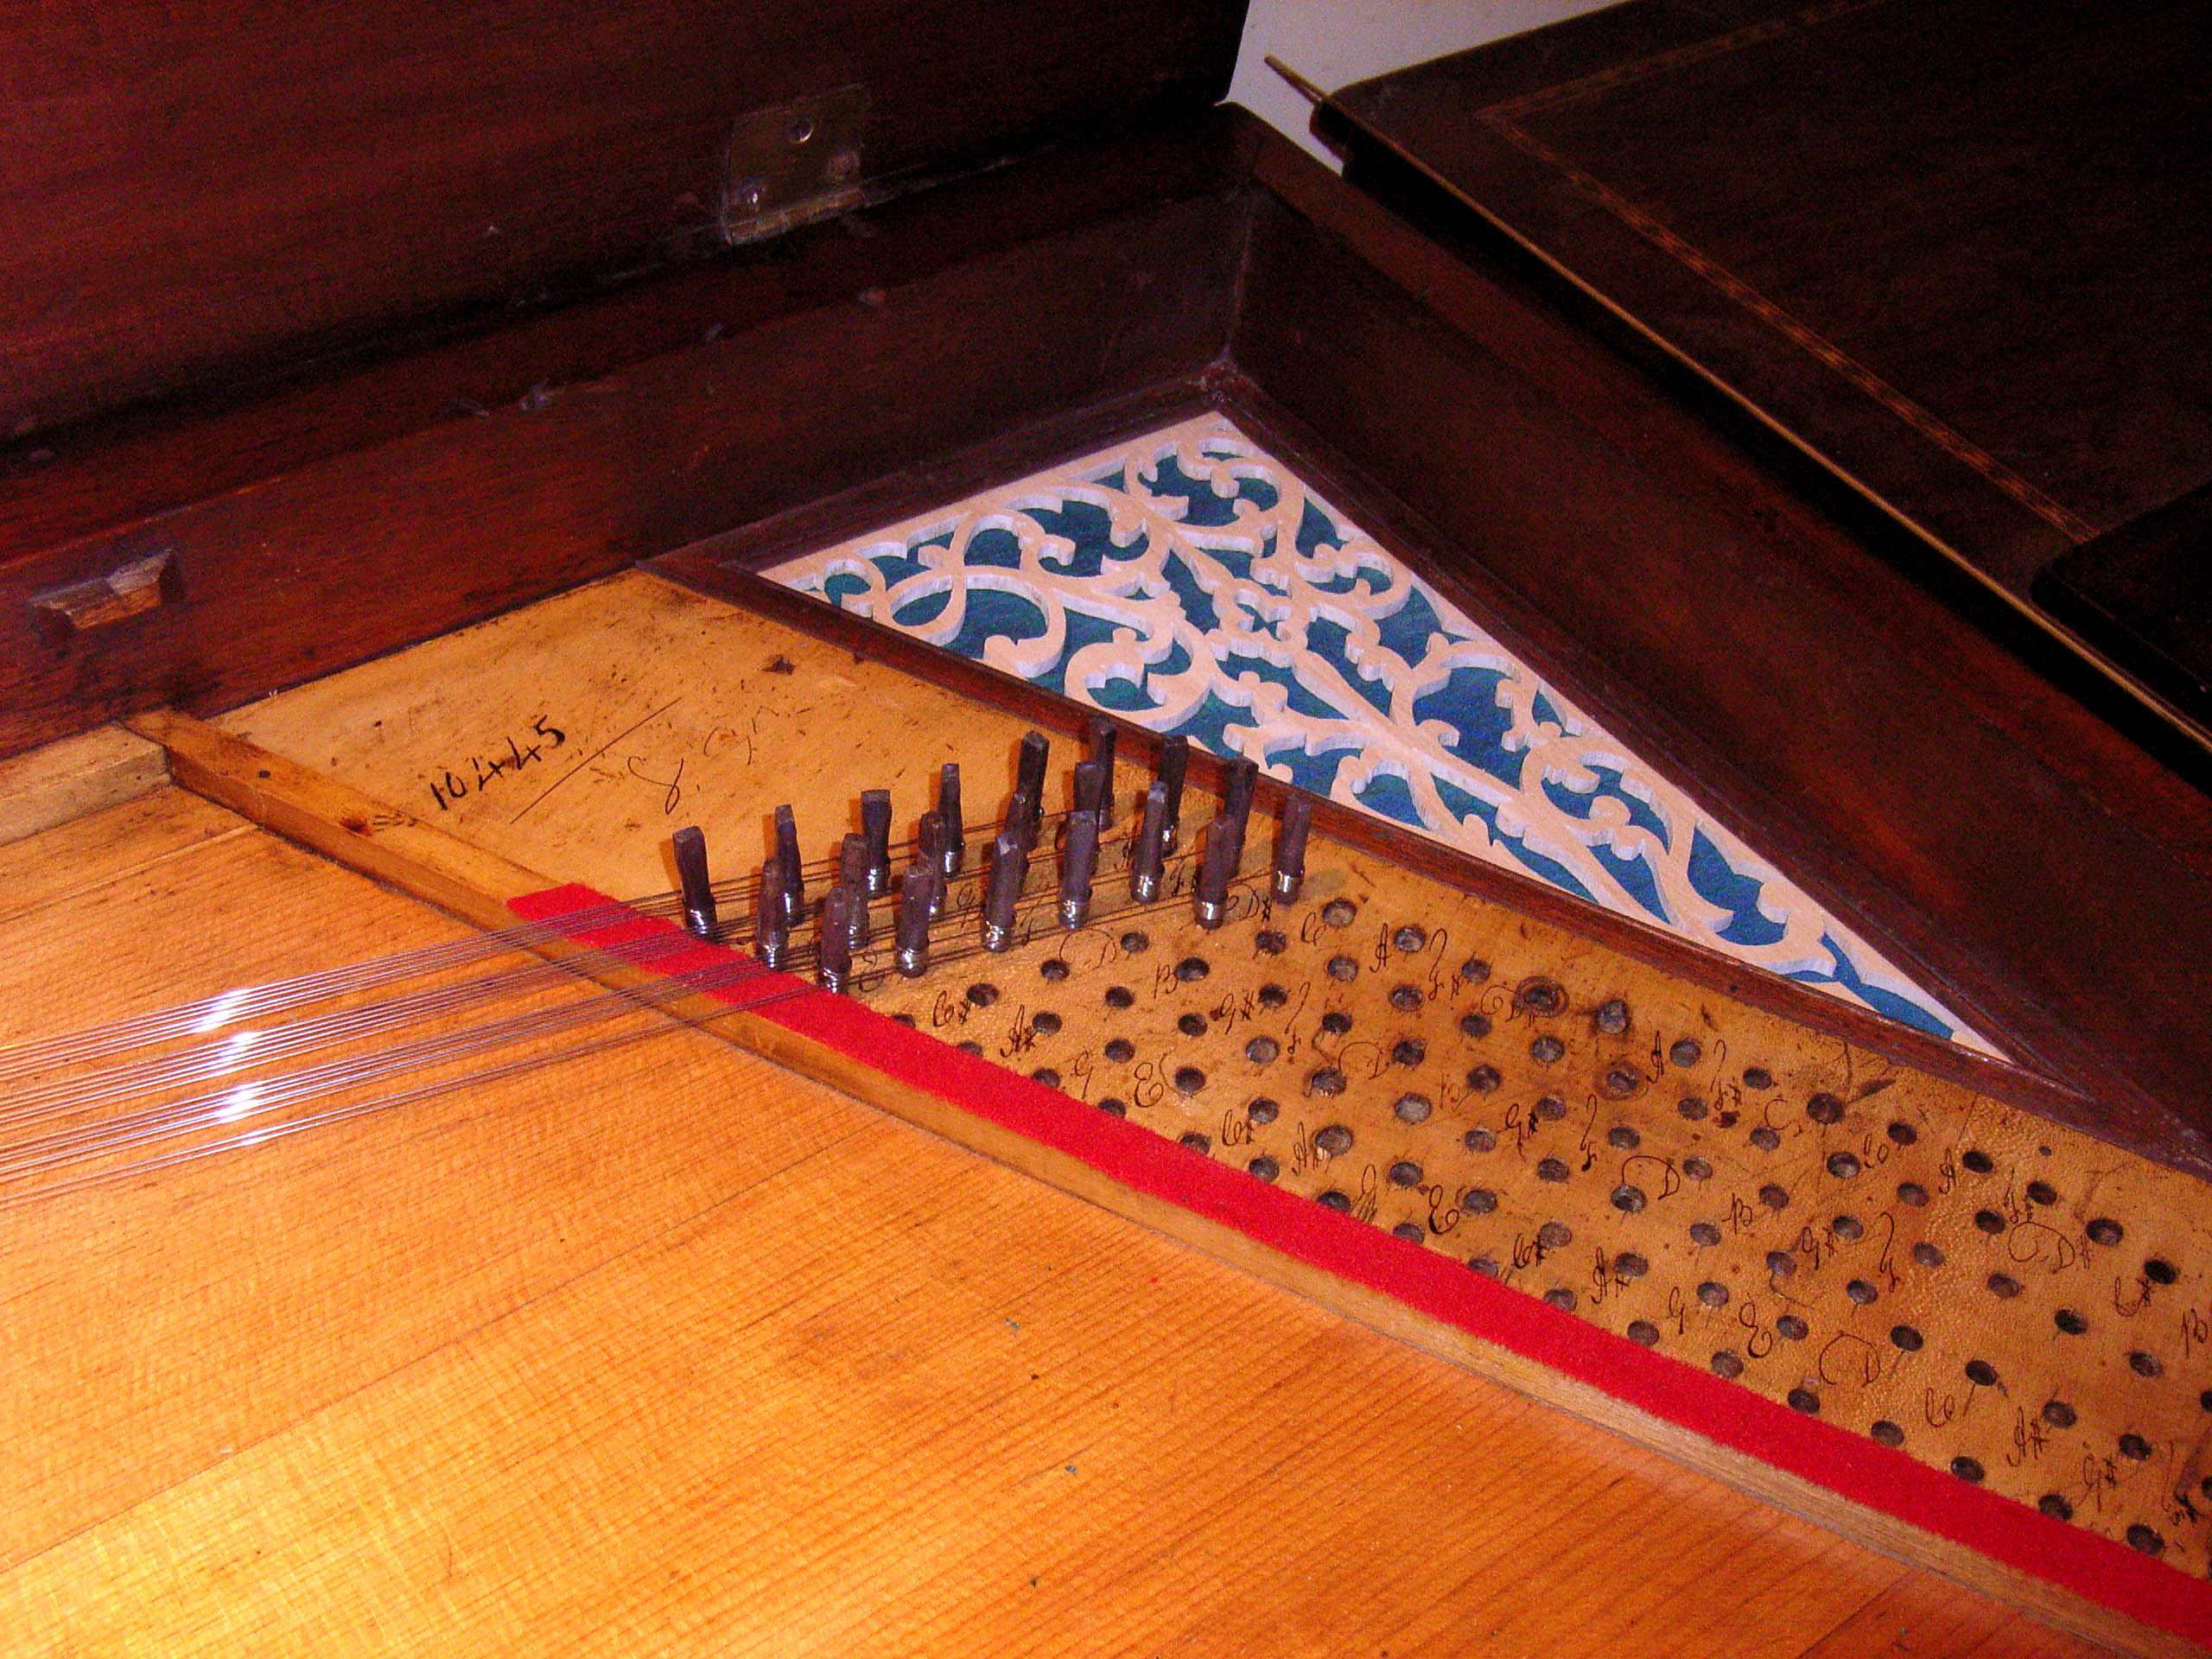
Another little thing that has been done is to restore the fretwork design in the back right–hand corner. The delicate fretwork in this piano was badly damaged, but a very similar piano turned up at auction recently. Sadly, this ‘other’ Clementi really was too far gone to be a restoration prospect, but its fretwork was intact. So a photograph and a bit of work on ‘Photoshop’ ensured that my fretwork is authentic. It is cut from a panel of lime, and looks a bit pale just now, but it will soon take on a more golden tone – especially if I can leave it out in the sun for a day or two... Oh, well, perhaps next year. The original silk backing was probably a vivid sea–green (traces remained) but the nearest I have been able to manage so far is a sort of peacock-blue. Yet another project for those winter evenings: dyeing silk to fancy shades (unless somebody has some?)
The other thing is the keys. The key–tops on this one were almost certainly the original ivories, but were badly chipped. I have no idea why.
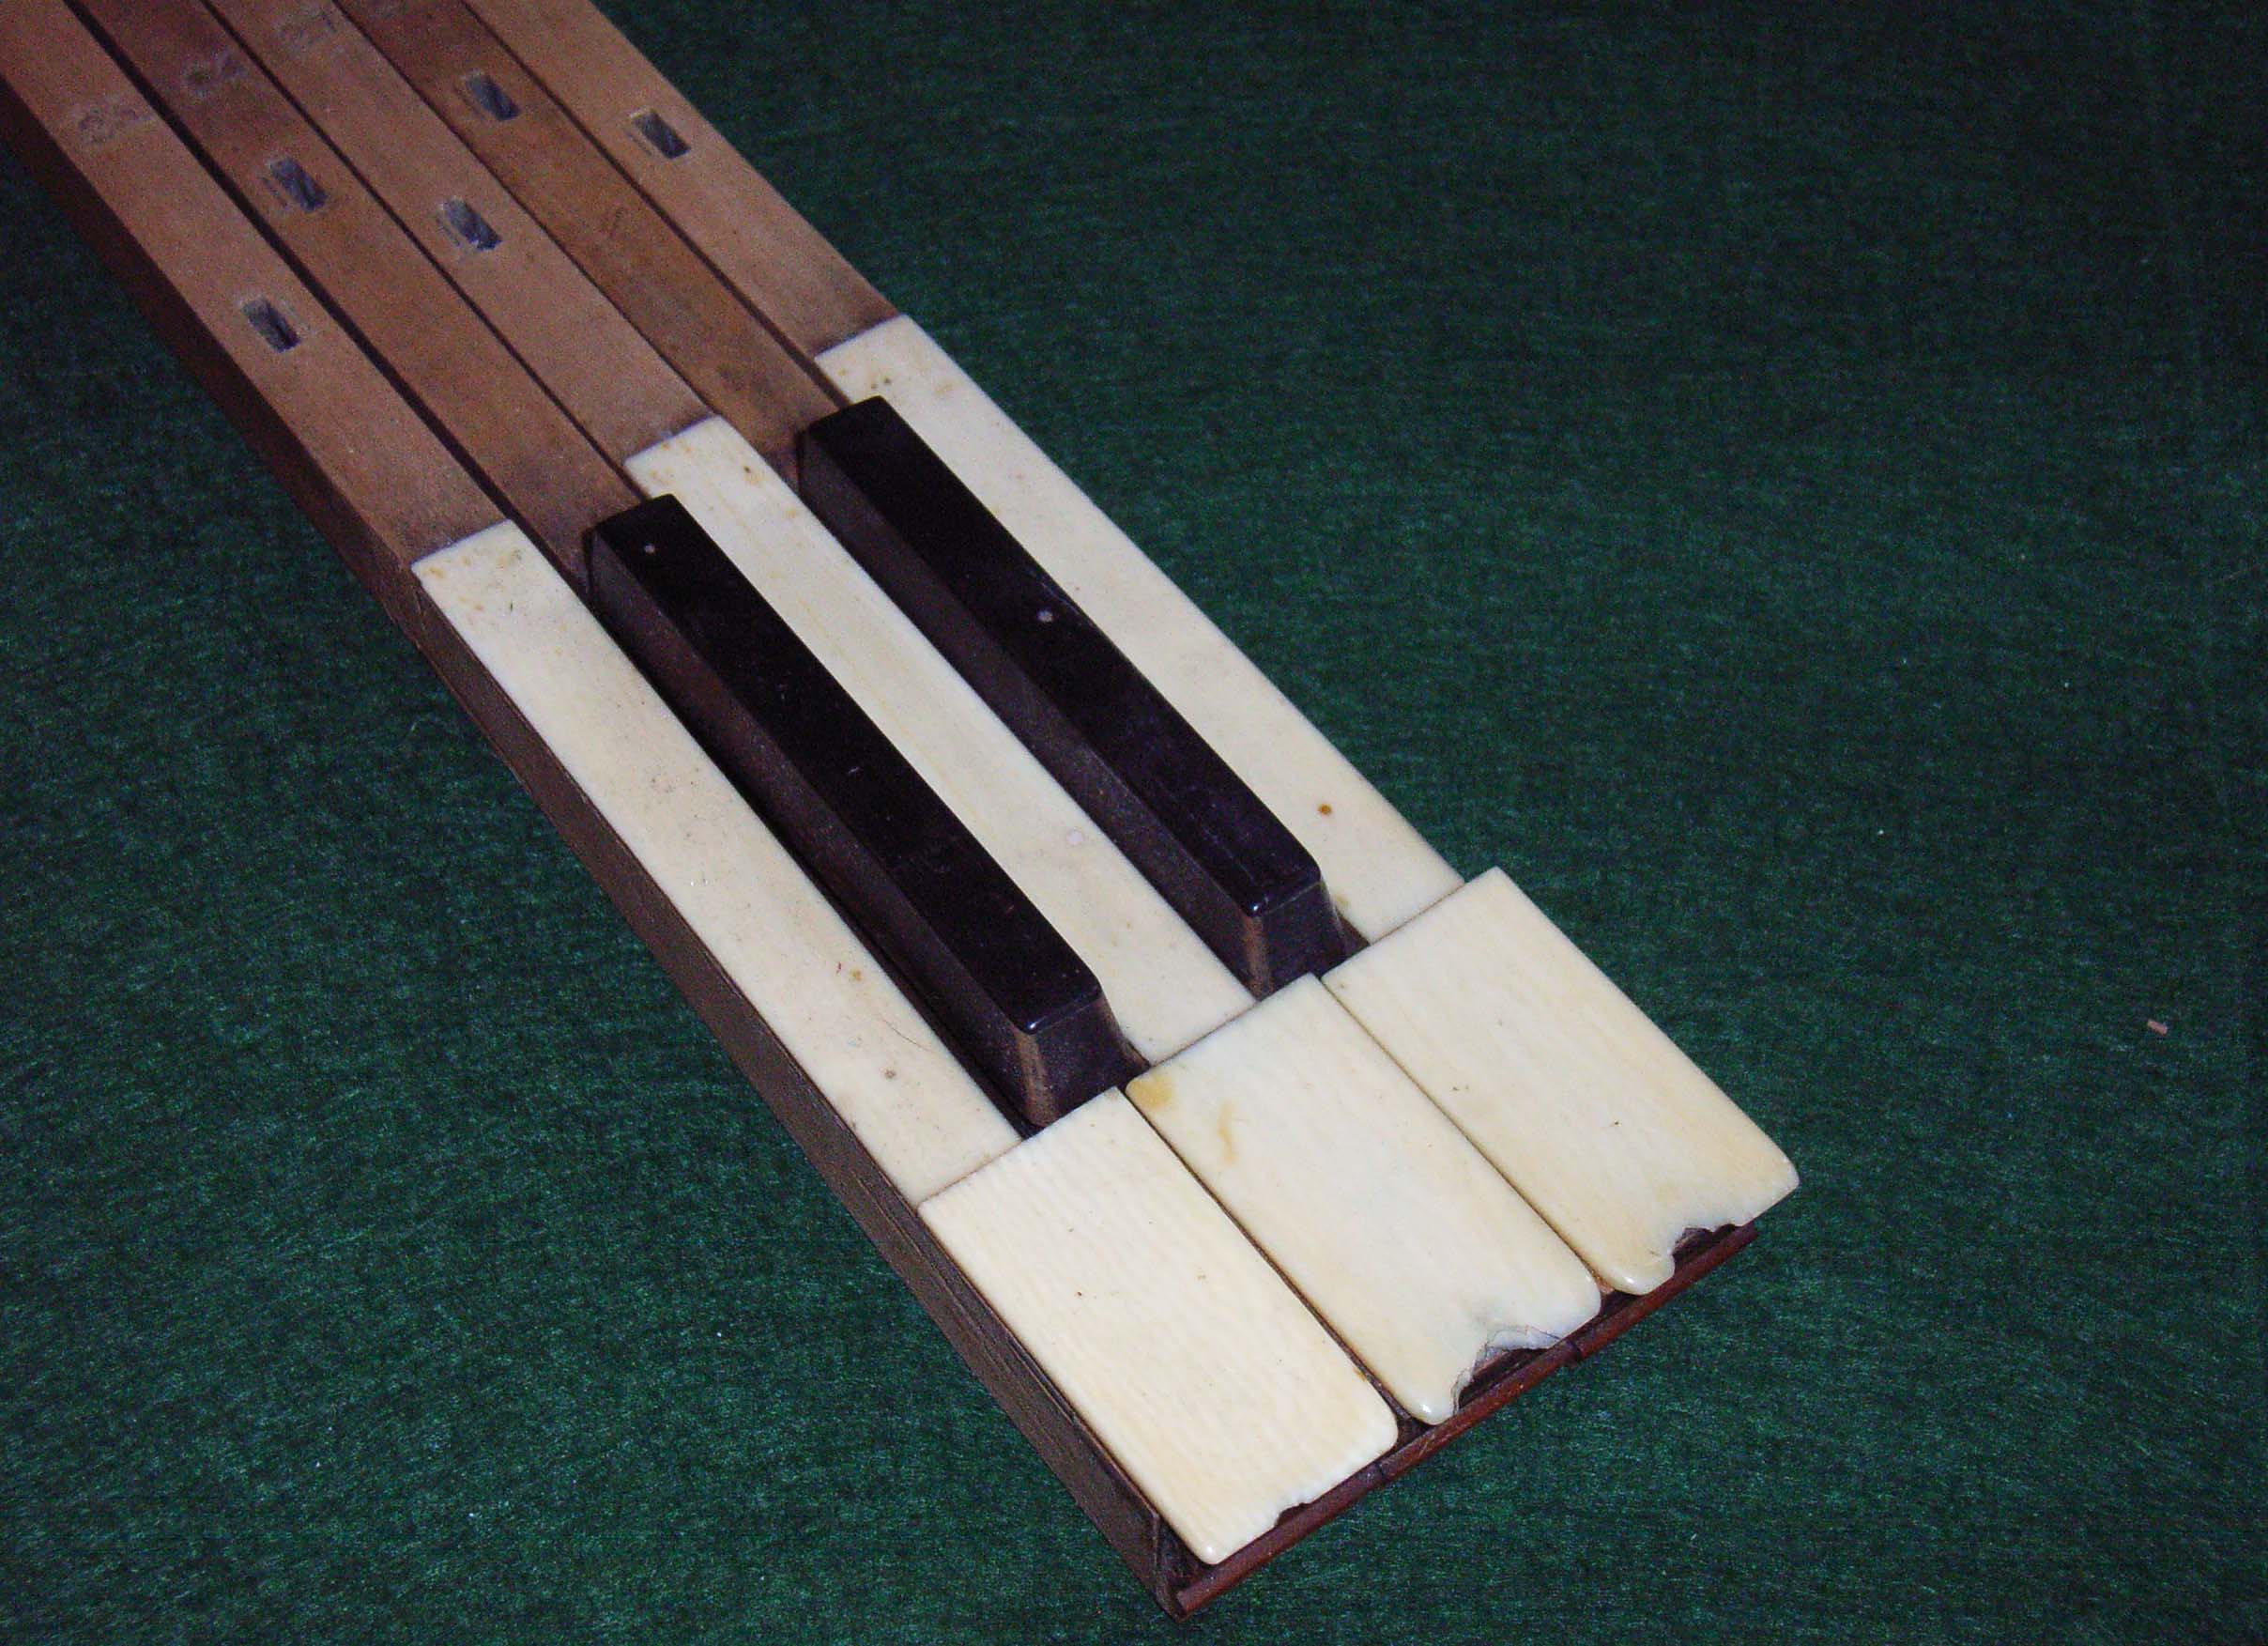
It is of course no longer possible to buy new ivory, and even if it were, it would look much too ‘white’. But over the years, I have salvaged key–tops from several nineteenth–century uprights, and this gives me a fair stock from which to find replacements. However, it is not quite that easy!
The ivory must be thick enough – it was very thin on some cheaper pianos. Also, the octave–span of pianos varies to some extent (this one is about 161mm) and the re–use of ivories from slightly narrower keys is not really satisfactory. A further complication is that the keys within the same octave on the same piano can also vary slightly. After gluing, shaping, and levelling, the surfaces of the keys were polished using a cloth mop on the lathe, with a suitable polishing compound.
So, all the keys are back now – which just leaves the dampers to complete, and the whole keyboard and action to be equalised and regulated.
Restoration Notes – Part 4
Apologies for slow progress for these last few weeks. I have been giving some attention to finishing my little ‘English’ spinet – a friendly little walnut instrument with a keyboard just short of five octaves. Happy to say, it works well, and the tone is pleasing – bright in the treble, with a good bass.
However, all the dampers are back in the Clementi now, and the adjustment to the action is more or less complete.
There were a few little problems: several of the damper bodies – the ‘Dollies’ were missing, and quite a few more of the damper wires fractured when being re–fitted or adjusted. The bass damper wires in particular can easily rattle against the strings – a problem which needs a gentle double–bend to keep the wire clear of the string. The original wires were made of tinned brass, about 0.85mm diameter; finding tinned brass was tricky, but Malcolm Rose kindly supplied a few metres of tinned copper. This proved ideal for the job, and putting the threads on the bottom ends was surprisingly easy, by cutting the thread with a wallpaper scraper in a rolling action. Its always nice when something works better than expected!
The green ‘dust cover’ on this piano has fortunately survived, and is now back in place. The piano is now starting to hold its tune well, and I have now made my first attempt to play some of Clementis charming Sonatinas. The highlight of the restoration is planned for February 18th, when Jeremy Eskenazi, founder of The Clementi Society, is planning to visit and play the piano properly!
Thank you for following this restoration project; it has been done in ‘real time’, and when we started, we did not know how successful it would be. Thankfully, there have been no disasters, and it feels good to have done something to enable one of Muzio Clementis pianos to sing again.
David Hackett
Chelveston, February 2008
Back to Muzio Clementi Society home page
Copyright © Jeremy Eskenazi 2008. All rights reserved.